Long ago in makeup land, eyeshadow meant exactly that creating shadows on the eyes for depth and illusion. Now, eyeshadow is the general term for any color and any color will color the eye area. I am all for that and love to play with eyeshadows but as I mentioned before, I am all about how eyeshadows can create illusions. And, I need all the illusions possible since I am getting closer to old age!
On my eyes I am showing how shading the eyes or in this case one eye to show the difference, can create the illusion of depth. I am not saying this is the only proper way to apply eyeshadow. On my other eye you will see the "fashion" application or the way your hand may follow the bone structure. That is great, experimenting is fun. I am not the eyeshadow police and I am not going to scold you for doing it the fashion way. I just want to show you the difference.
Take a look at the first picture, the left side has been shaded with a satin matte taupe. (Actually, it is a darker brown to show some difference in depth. In a tutorial you will see how a matte taupe works and how it pictures.) This is the reason why everyone should have a matte taupe or a color that is at least two shades darker and cool toned if you have darker skin. I apply the color on the side of the nose just halfway and up to the curve of the browbone. I also apply a thick line on the bottom lashline. This will make dark liner appear less harsh. I also apply the shadow on the side of the eye which is important because this will separate the eye area from the rest of the face or the cheekbone area. Make sure to blend to get rid of the harsh lines. The end result should just be a naturally looking shadow.
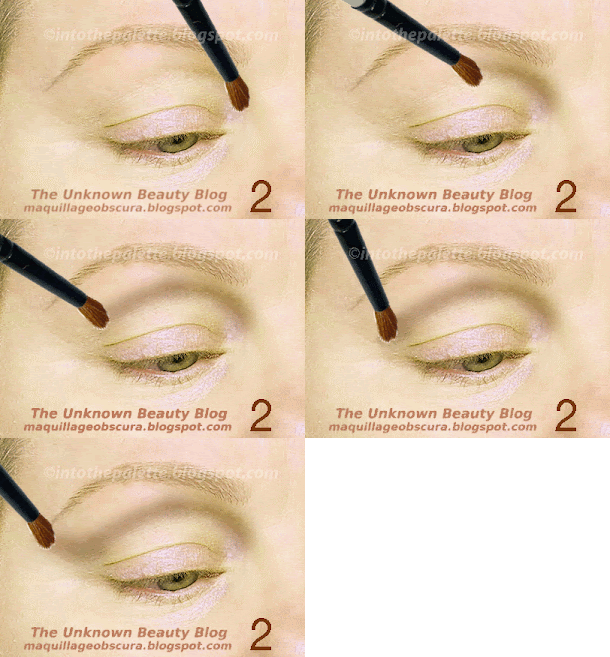
The second set of pictures shows how and where the crease color is applied with and without the shadows. On the left you can see from the side, the color stops pretty much in line with the end of the top lashline. The right side is probably the usual way it is done. You just allow the end of the brush to hit right above that cheekbone and stop.
The third picture I skipped some steps. I blended the color a bit and added a shimmery lid color. I also show the difference between the winged liner application. On the left I want to lift the eye so I apply the wing of the liner up to where the bone creates the crease. The right shows how it looks when it follows the lashline and outside the eye area. Nothing is wrong with this look BUT if you are maturing like me and your eyes are beginning to droop in this area, you will notice this wing will not fly!
In the fourth picure, I smudged the end of the liner a bit and made a "v". Now, on the left the "v" is much smaller but it still creates some depth. I also added some eyeliner to my top lashline. On the right, I smudged a much larger "v" which is actually where the shadow color should have been applied.
The last picture shows the finished look. The look on the left gives that illusion of depth by separating the front or lid area from the rest of the area. Remember, you are three dimensional and a crease alone defines just the flatness of the face but to create depth you have to think of the sides of the eyes! The right side shows the usual method which for me
So, next time you feel your shadow doesn't look right due to the sudden realization to mature eyes OR if you just want that illusion of depth no matter what age. Try this method.


