I have eliminated the steps on what products have been used. I will just mention what colors I have used. I will also leave out the details of how I did my winged eyeliner and such because I covered that many times in many posts.
Check out: The Similiarities and Differences of the Many Eye Shapes for Makeup - The Orbital Ridge
Shading the eyes can create that illusion of depth and also separate the eyes from the rest of the face which is important especially since everything is in high definition.
1-Here are my eyes prepped and primed.
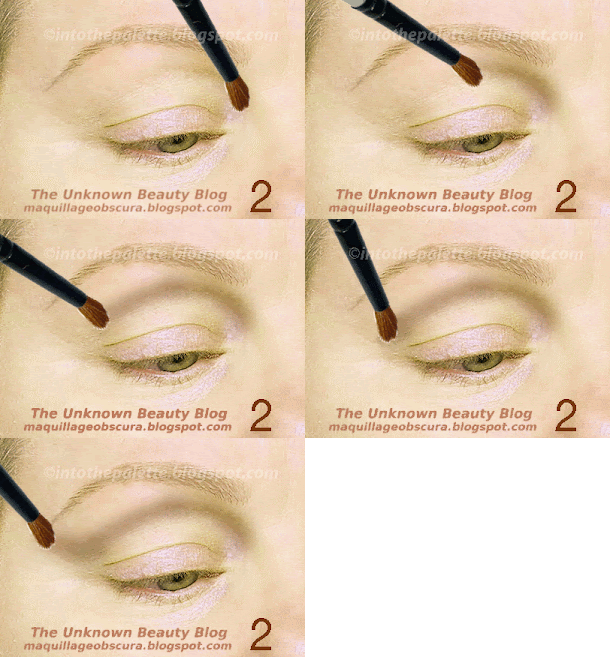
2-Apply the taupe or contour color on the outer side of the eye. Make sure the color is a matte or satin matte. This has to look natural and not like some pretty cosmetic color. 3-From the side you can see it is pretty much in line with the angle of my bottom lashline. Or it should just separate the area of your cheekbone from your temple. Get it? You are separating the cheek area from your eye area!
4-Apply on the browbone that usually starts to curve into the nose and stop at level with the tear duct or wear your nose is the skinniest. 5- Apply a thick smudged line on the bottom lashline. Now, remember since this is a taupe or a shadow color, it will really be undetectable as an eyeshadow but will work to create the illusion of depth.
6-The application areas. 7-Blending the color. 8-Blended. See how it is just a slight depth of color?
9-Apply a base color (peach, ivory, whatever) from lashline to browbone. You can barely see the taupe that I applied in pictures which is the way it should be but in real life it is slightly visible and the base color should be applied BETWEEN these two shadows. 10-Apply the crease color (orbital ridge). I applied a cocoa brown. Notice how it doesn't lower onto the side of the eyes. It is actually starting right after the "shadow" area.
11-See from the side where it ends? 12- Blend. 13-Blended.
14-For the lid color I apply a shimmery light blue. 15- From the side you can see the color does not go any lower than needed. You also can't see the taupe from the pictures which is what makes taupe the ultra natural no-makeup color!
16-I apply the same blue on the bottom lashline on top of the taupe which gives the color some depth. If I used a dark color, the harshness of it would be softened instead. 17-What it looks like so far.
18-This is the angle of how I put on my winged liner. 19-From the front it may look funny but that can be filled in or eyelashes can be applied.
20- I fill the area in since I will smudge it later. 21& 22-What the wing looks like at different angles.
23-Apply the same color on the outer third of the bottom lashline and softly apply to the rest which really disappears when it reaches the inner corner of the eye. 24-I can keep it this way but I smudge it for a softer look. 25-Smudged.
26-I apply black liner close to the lashline but when I reach the end, I slightly lift it up leaving a gap between my lashes and the liner. Virtually undetectable since the area has been smudged with a dark color previously. 27-I smudge just a touch on my bottom lashline.
There you have my finished look! You can sees the taupe creates that natural depth which really makes the eyeshadow look more natural since the actual eyeshadow colors aren't compensating for the shape or depth of the eyes.
Hope this tutorial helps somewhat. If you have any questions just email.
Olivia


