

Yes, I am in the hood of hooded eyes and so is Lorin from The VeganAsana. She and I have used our eyes in this tutorial which first appeared on the now defunct Into the Palette blog. This tutorial may focus on hooded eyes but it is for every shaped of eyes of any age. At first it may look overwhelming, but remember a brush alone is not going to apply your makeup, you really have to use your brain with it! Once understood in doesn't take much time.

You can have beautiful eyes like Lorin. So, check out this tutorial on How to Make Mature Hooded Eyes Stand Out!!
This post features Lorin who has been a long time makeup buddy in my virtual world. She has a blog called The VeganAsana, a lifestyle blog pertaining to veganism and yoga. I read her blog because it is a little corner of my relaxation world. I swear if you start reading it, you will start breathing more deeply!
Lorin has hooded eyes, mature hooded eyes. I have mature Asian hooded eyes. Basically, both of us are in the same boat, we are both intelligently mature! Anyway, with hooded eyes or even any maturing eye shape, you have to remember that the muscles are sagging but the bone structure is still intact. Applying eyeshadow means just exaggerating slightly the application from what you are used to. What is also important is to define the eye structure without destroying one's own beauty. You can use color but think of it as an accessory, less is more.
For this tutorial I am just using four eyeshadow colors: light satin matte peach, medium-dark brown, shimmery gold champagne, and a shimmer navy blue.
The Eye Base
Starting with the light peach, apply the color from lash line to brow bone. The color may look like your skin tone which is good. Ivory in this case will bring attention to the brow bone area too much, thus emphasizing one's own maturity a bit too much.

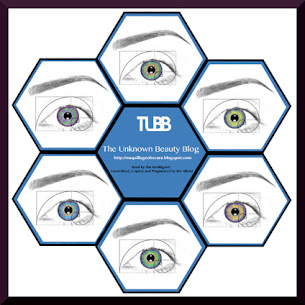
You can see on Lorin the direction of the arrows is the suggested movement of the makeup brush.
The Orbital Ridge
Since the entire eye has been colored with a light peach. Applying the medium-dark brown on top will turn the color into a taupe or a softened contoured brown, resembling the contour color of your skin.

On myself I show how I tilt my head back slightly to color the orbital ridge. I usually go higher than the actual since after blending and lowering of that area, the shadow will be at the spot where it should have been when in my 20's. The same goes for Lorin. The red arrows show the direction of the brush and how it would blend the color. Notice how the color is blended up to the side of the nose. This contours the bridge of the nose at the same time.

Continue with the same brown and apply a thick line on the bottom lash line and bring it around to the top indicated by the red arrows. This gives depth to the eye and also encloses the lid.

You can see on Lorin the result at different angles of the eye. This alone defines the eye by giving it shape and depth.
The Lid
The lid is the area to play with color. The way you apply shadow here, whether you divide the area into parts horizontally or vertically for colors is your choice. For Lorin and I, a nice shimmery gold champagne is applied.

Again the purple arrows show the direction and blending of the eyeshadow. See how high the color is applied. It needs to be applied like this to give the illusion of depth and openness to the eye.
The Brown Line
This is an important line. It really gives more to the eye by creating a distinct separation of the orbital ridge from the lid and crease of the eye. I would say 99% of the time if your eyeshadow doesn't look right, it is because it is lacking the brown line!

Use the same brown shadow to create this line. The line applies onto the bone area of the orbital ridge and side of the nose. You can see the brown line at different angles on my eye. Below, you can see the difference between the eye with and the eye without. See how the area below the line or my lid area gets more attention than the one without?

On Lorin I applied it a bit differently but will show you how I originally applied it onto my eye. To see it more clearly, I used a red line instead. Remember this line is drawn on the bone. If you have hit flesh you are too low. You may think on Lorin it is too low, when the orbital ridge lowers, the line lowers and thus from the blended image goes into the crease. In this photo, I extended the end and you can see how it creates that angled end at the end of the outer eye. I did this to my eye and it extends and widens the eye look. I would prefer not to but did it for this tutorial. And, since Lorin is a mature woman, I really do not want to emphasize the outer corner.

See how I didn't follow the curve of the outer brow bone. I stopped it right before. You can see how it hits the side of the nose. Usually I like to start at the same level as the tear duct and just swoop it around in the direction of the arrow. Blending it can go in any direction.

Here is what it looks like on Lorin's eye at various angles. Draws attention to her eye more doesn't it?
Defining the Lid

This is the area where more color can be applied. I just used a simple shimmery navy blue to create more depth to this area. See how the eyeshadow is applied is angled? All I did was follow the outer end of my lash line as a guide. On Lorin since she has a bigger lid area than I do, I used the one swoop method on her. Here is my second step on as I extend the color up and inward to meet that brown line. See the "v"? Next, I applied a line on my lid to blend into that "v".

Smudge the same color onto the lower lash line. Yes, it is applied on top of the brown that was applied. This softens the color and makes it less harsh.
The Eyeliner
On myself I used a shimmery navy blue eyeliner. I applied it close to my lash line and allowed the end to meet with the blue eyeshadow. It is similar to a winged eyeliner because it does wing up just a tad at the very end.

On Lorin I used a charcoal color instead. To make it easier to see, I removed all the eyeshadow in the first picture. See how it lifts a bit at the end? It extends out of the lid for two reasons: One it lengthens the eye; two if you are applying false lashes, this is how the lashes are angled and should end instead of following your usual lash line.
The second picture, the liner just sits in with the rest of the blue eyeshadow.

Another angle and the front view.
The Finished Look


See Lorin's before and after? What a difference! Your eyes are drawn to her eyes and lid area because of the distinct yet subtle separation!
I hope this tutorial opened your eyes (pun) a bit. I have realized that some of my former tutorials have become cluttered. I may well have to revise them someday with better explanations and easier methods. But for now, try this one!
Thanks again on taking a look!
And special thanks to Lorin!!!!
Olivia


