This tutorial is to how to make Asian eyes, especially Asian monolid eyes look larger. It is a very wearable and polished look. Nothing over the top, an everyday eye look for those who just want to enhance their own beautiful almond eye shape.
For those of you not familiar with the term "monolid", it basically means the crease creates a smaller lid area. This makes the eye look as though it has no lid but it does just not as much space compared to the caucasian eyes.
What makes Asian eyes different is there are no set areas, this means more experimentation. Once you get comfortable with the basics, the sky is the limit on how to shape them!
For this post, Susan one of my cult followers volunteered her beautiful eyes. Give her a round of applause! She wanted larger eyes and who doesn't? The way shown here is a simple way and can be done with neutrals or with colors. It all depends on your comfort level. There are some basics like contouring which I will mention as the tutorial goes along which help if the colors are neutral. This is basically for depth and illusion. The rest you can choose anything from colors to neons if you like.
I picked basic neutral colors for this tutorial: peach, taupe, dark taupe, shimmer silver taupe, dark brown, dark brown pencil, purple eyeliner.
To follow along I used my non-perky eyes to correspond with Susan's.
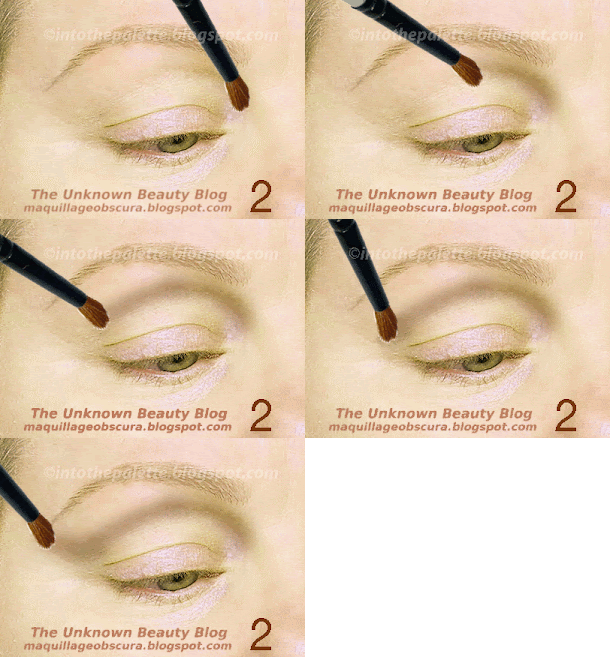
1-Using the peach brush all over from lashline to lid. 2-This is a little trick and on Asian eyes I would say it is a secret area. Emphasizing this area with a dark brown pencil is better than black because it is to create the illusion of depth and to make them look larger. (Of course, this is just my opinion and if you prefer other colors then that is fine. I am not the makeup police.) 3-Take the brown pencil and just line the top and bottom outer 1/3rd of the eye. 4-What it should look like.
5-Take a brush and smudge the line to soften. 6-For the bottom, extend the smudge all the way to the inner corner of the eye. 7-How it should look.
8-Remember in my post for shading the eyes? I am doing it a bit out of order. How you do it is your preference or even if you do it at all. However the little wing at the side of the eye does give more depth and separation to the eyes. Take the taupe and extend out from the lid corner. 9 & 10-How it looks from different angles.
11-Using the dark taupe apply a line on the orbital ridge. Now, remember this is not the crease or the fleshy part of the eye. It is the bone area that slopes upward and becomes the browbone. On most Asians the area is not as distinguished as occidental eyes. Feel that area with your finger first then tilt your head back slightly and look into the mirror and mark that area with the shadow. Try not to look straight ahead and raise your brows, this will lower the mark into the fleshy crease. 12-Blend. 13-Blended.
14-Take a shimmery silver taupe and apply all over the lid up to the line created by the orbital ridge. 15 & 16-How it looks from different angles.
17-Take a dark brown shadow and apply a thick line onto the lid stopping right before the outer end of the eye. See the arrow in Susan's eye? That is where the shadow will angle up. 18-This is similar to the winged eyeliner. 19-How it looks not blended on my eye.
20 & 21-Smudge the shadow more. 22- How it should look and on a monolid, it is allowed to surpass that lid area.
23, 24 &25-Next, apply more of the dark brown shadow up to the orbital ridge.
26-How it looks not blended. 27-On Susan, the arrows show the direction of the shadow blending. This will blend into the orbital ridge shadow. 28-How it looks.
29-Take the same dark brown and smudge on the lower lash line and connect with the top at the inner corner. 30-Take a dark purple eyeliner and apply close to the lashline, stop before you get to the end. From the opposite end where the lid crease is, make a dot. 31-Connect the dot to the line. This is again a winged eyeliner.
32 -How it looks from front. 33-Eyes slightly closed. 34-Apply highlighter. 35-Contour the side of the nose.
The finished look. Add some mascara and/or lashes and VOILA!
Remember this is only one way to do monolid eyes. Emphasizing the orbital ridge may look a bit off at first but it does make a difference especially in pictures. The color may be as light as you want it for just that no makeup emphasis or as dark for a major cut the crease look. As for the rest of the colors, just remember if it isn't contouring the the eye, then replace it with any color you like.
Hope this helps or gives a different perspective to some people with monolids. Until next time, just practice and have fun.
Special thanks to Susan!!!
Olivia


