I have discovered the popular eyeshadow tutorials on this blog are the ones which enhance your natural beauty. I think this is great because everyone should embrace their own unique beauty and what better way than to make your eyes stand out with just the right amount of color and improvement.
In this tutorial, Cathy Cat has volunteered with her hooded eyes. I know there are many of you who have questions about your own hooded eyes. Hooded eyes have the same skeletal structure as any other eye shape.
For this naturally polished look which is wearable everyday of the year and everywhere (and, if you have a similar skin tone to Cathy, cool tone and fair), you will need the following colors: shimmer ivory gold, shimmery peach gold, warm matte taupe, and matte dark brown. For an eyeliner I chose a grey which is less harsh than black but still contrasts with the browns.

Shading the Orbital Ridge

1-Start with a prepped eye.
I call this the s-curve because it curves on your eyes like the letter "s". This is really the same as the “brown line” seen in How to Make Mature Hooded Eyes Stand Out.

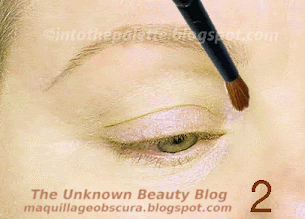
2 -With the matte taupe, follow your orbital ridge bone starting at the side of your nose even with your tear duct then all the way around your eye socket.

3 - Blend the taupe upward to your eyebrow.
You may think this is too much shadow. For one, if you ever notice, taupe is a color that disappears. It hardly shows up in pictures but it is the perfect color which will act as a guide for other colors. Taupe also de-emphasizes the bulge on the brow bone. It also fills in the gap between the crease and the brow bone. Again in pictures you will see that area just like the color of your skin. As for close set eyes, don’t worry, the inner corner will be opened up.

4 - With the same taupe apply a thick line onto the bottom lash line, starting at the inner corner then follow the lash line and connect with the top. 5 - How it looks so far.
Highlighting the Eye

6- With the ivory gold shimmer, apply the shadow starting right close to the taupe you applied on the side of your nose. In actuality, you are blending this a bit to make it less noticeable. Continue the thin line underneath the brow line and end it when you hit what is the bone of your cheek. 7 - Take the same color and starting at the side of the nose again, go around the bottom part of the eye and up to the side to meet with the previous highlight. 8 - How it should look from the front.

9 -Take the same color and highlight the inner corner. 10 - Apply onto the inner third of the lid to open up the eyes. 11- The look so far, see how the eye is beginning to look bigger and more wide awake?
Coloring the Lid

The lid is pretty self explanatory. 12 - Take the shimmery peach gold and apply onto the lid. 13 - Make sure you blend it up to the orbital ridge.

14 - Apply the same color onto the bottom lash line for a glow and for a look that will give the eyes a look of a soft natural eyeliner. 15 - The soft natural look so far.
Enclosing the Lid

Enclosing the lid gives depth to the eye by emphasizing just the outer end of the eye. 16 - With the dark matte brown eyeshadow, apply right onto the end of the lid from lash line to orbital ridge. Usually the brush will sit right on the eye socket and hit bone, just color the fleshy part of the lid 17 - Apply the same color just to the outer 1/3rd of the outer end of the bottom lash line and go upwards and blend with the top. 18 - What it looks like so far.

19 - Take the same color and re-emphasize the orbital ridge. 20 - Stop about right before the brush curves downward.

21 & 22 - How it should look so far.
Eyeliner

This is pretty simple. For this look, all you are doing is emphasizing the top lash line. 23 & 24 - Take the grey eyeliner and apply.

25 - How the eye looks. 26 - Add some mascara.

Here is the complete eye look. The before and afters on Cathy's eyes. The colors are soft yet they define the eyes which look naturally beautified! The eyes are lifted and open!
Hope this tutorial helped some of you. And, Cathy, I hope I answered some of your questions. Your eyes are gorgeous! If any of you have any questions please leave a comment below.
*Special thanks to Cathy Cat! XOXO*