The Definitive Guide - Simple Daytime Look for All Eyes
If you read my series on the Simplified Definitive Guide to Basic Eyeshadows and Application Techniques, you probably noticed a more concise method of eyeshadow basics. The basic areas of applications on the eyes will pretty much work for every eye shape. In this post, I show the same simple daytime/weekend look on several eye shapes.
For all the eyes shown, the same colors were used: Ivory Gold shimmer, Apricot shimmer, Matte Taupe which are the basics. For the lid coloring a medium matte brown since the look is a simple daytime/weekend look; it will give the eyes just enough definition without looking dramatic. Dark brown is used as an eyeliner.
The eyes I show it on are on hooded eyes, Asian eyes (monolid) and the regular shaped eyes (a balance of lid and browbone).
The Beginning
Step 1 - Start with a clean eye, all prepped and ready.
The Taupe
I would say matte taupe is the most important color, whether you use a light taupe or a dark taupe; it will stabilize the color or act as a go-between your skin tone and eyeshadow tones.
Step 2- You may feel uncomfortable at first when doing this and it is understandable because it isn't the conventional beauty eyeshadow application. Take the taupe and apply all around the eye to the side of it and on the side of the nose and down. Notice how it is applied wider than some smudged eyeliner on the lower lashline.
This is done for three reasons:
- It will look like your skin tone and any eyeshadow or eyeliner applied on top will adhere better.
- This kind of reverse conceals the bottom lashline area. Sometimes, when you apply a concealer up to the lashline, your eyes can actually look more puffy. This is because the depth of the eye has disappeared. The taupe will give the area depth by working with the skin color beneath. If you are worried about it looking too dark. That is when the highlighter/concealer will be needed to cover it which is one of the final steps in eyeshadow application.
- This separates the eye area from the rest of the face.
The Browbone
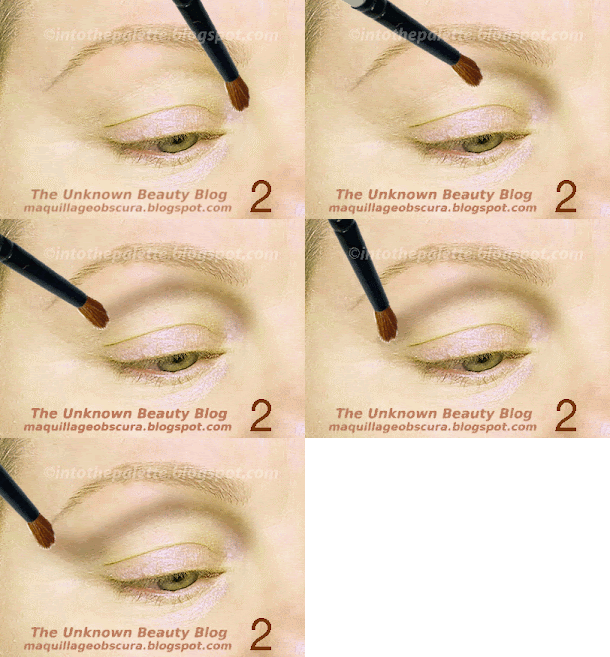
On the various eyes, the red arrow shows the direction of which way the brush should go. I only show this because your bone structure will be your guide.
Start at the outer end of the eye and just apply on top of that bone area all the way to the area between the bridge of the nose and your inner eye corner. Allow the color to go down to your natural crease (which means it will go past your orbital ridge) which will be the fleshy part of your eye or right into the eye socket but skip the lid. For deep-set eyes, this will lighten the hollow and for other eyes, this will allow the matte colors to lighten on the orbital ridge.
Step 3 - Since a matte taupe had been applied, applying a shimmery ivory gold color to the brown will give the brow area a luminous glow.
The Lid and Orbital Ridge
This is where a matte color is best applied. The lid will have a concentrated dose of color while the crease and orbital ridge will have a diffused version thanks to the shimmer applied there from before.
Step 4 - Apply the medium matte brown color from lashline to orbital ridge.
To give the lid some dimension, a shimmery apricot eyeshadow is applied. This will lighten the matte brown and also allow it to emphasize the shape of the eye by giving it depth to the outer end of the eye.
Step 5 - Again, the direction of the application of the eyeshadow really helps because the bone structure will be the guide. Starting right at the outer end of the lashline or let the brush sit in between the bone and your eye socket. Just allow the brush to curve upward (in the direction of the arrows) and hit the inner corner of your eye.
The Eyeliner
The same apricot shimmer shadow is used for bottom lashline. Since it is applied on top of the matte taupe, it will just appear as a natural skin tone glow .
Step 6 - Apply a thick smudged line with the apricot shimmer.
For the next steps, you can use a dark brown pencil or a dark brown eyeshadow and use it as a cake eyeliner.
Step 7 - Line the bottom lashline with the dark brown just enough to emphasize the lashline. It will be a thin line.
Step 8 - Do the same to the top lashline and stop right at the end of it. Do not connect the ends.
The Highlighter
After applying all the eyeshadow, fall out is inevitable. This is when you want to apply the highlighter (or a lighter concealer) beneath the eye area to wipe the specks away.
Notice how it starts close to the inner corner of the eye and dips below the bottom lashline. The taupe and the eyeliner applied will give the eyes some depth while the highlighter illuminates below it.
Step 9 - Take the highlighter and apply from the inner corner, below the eye area and up to the side of the face onto the high end of the cheekbone.
How It All Looks
With the eyes closed, the pattern of the eyeshadows should look like the following:
Now, here with mascara applied.
*Special thanks to Kim, Lorin (The VeganAsana), Lisa (Beauty Info Zone), Jessica, Susan, Brelki, & Lola.*


