This is all seen from a front view which is basically how you would see your eyes when looking in the mirror. This post will show in detail what happens around the corner or the area of the eye which turns into the side of your face.
I chose a basic palette of neutrals (aka The Fab Four) as an example. You will need an ivory, a light taupe, a medium warm brown, a dark brown, and a black shimmer. You will also need a flesh-tone pencil (concealer pencil) and a black pencil.
Eyeshadow is really all about packaging the eye area. You see your makeup packaged in pretty compacts, why not do the same for your eyes?
Enclosing the Eye
I often mention enclosing the lid or separating the eye socket from the rest of the eye structure for depth and emphasis. This is about separating the eye area from the rest of the face. This also will provide guides for where colors are applied on the brow bone and orbital ridge.
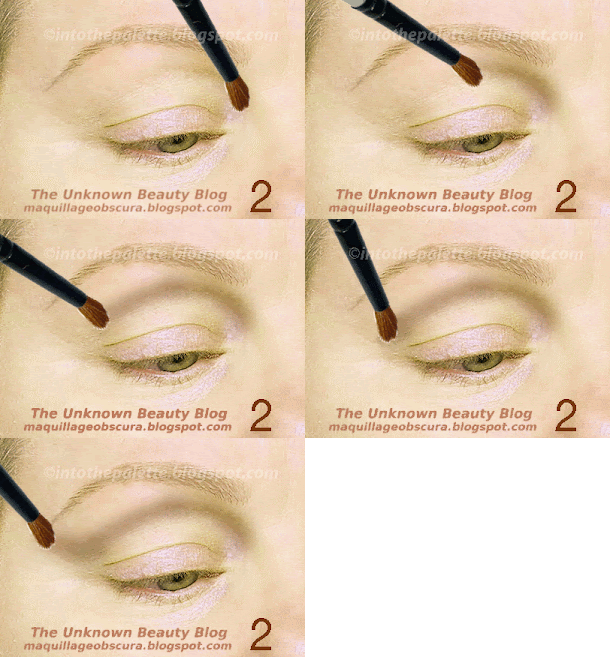
1 - Start with a prepped eye. 2 - See where the purple is lightly outlining the side of the nose up to the brow. That is where a light taupe shadow will be applied which will contour the brow area and the nose. See where it is dimly outlined at the side of the eye? This area is in line with the end of the eyebrow and sits above the cheek bone. It will be lightly shaded with the taupe. 3 - View from the front. Don't be surprised if the area stretches further back than you think.
4 - With a sweep of the light taupe, you can see how it leaves a guide for the rest of the eyeshadows. 5 - Front view. The taupe pretty much will blend in with your skin tone. If you take a picture, you probably will not see it. If in real life you feel you see it too much, just blend it a bit more.
Separating this area does one of two things, for one it emphasizes your eye area. Two, it shows how the brow bone area and orbital ridge are really used to color the front plane of the eye while the light taupe is actually creating the sides of the eye area.
Orbital Ridge
6 - Next, define the orbital ridge. 7 & 8 - Front view. The orbital ridge is defined and the taupe applied before sweeps the eye upward and back, lifting the eye. You now have divided the eye area from side to side and top and bottom or brow bone from the lid area. See where I am getting at?
The Brow Bone
I skip this area completely for this tutorial. Why? If you have properly prepped the eye area by concealing and neutralizing the skin, your brow bone becomes naturally highlighted without eyeshadow. Take a picture to see this. However, if you want to color that area, you may want to use a color similar to your skin tone or the same color used on the orbital ridge.
The Banana (aka Lid Area)
9 - Taking the flesh colored pencil, apply to the inner corner of the eye and extend it beyond the natural tear duct. This will lengthen the inner corner. 10 - Do the same with the bottom lashline by applying the color beyond the natural tear duct. 11 - The front view shows the highlighted inner corner. Just that alone elongates and opens up the eye.
12 - Apply an ivory eyeshadow onto the lid and up to the orbital ridge. This will lift the eye by creating a new crease, one that is above your natural crease. It will also make your eyes look bigger. Also, if you have deep set eyes, this will lighten the hollow (crease) area. 13 - Front view. You can use another color for this. It doesn't have to be ivory, this is one area where you can play with color.
Elongating the Eye
Elongating the eyes should give the eyes width but also lift the eyes. Sometimes, our own habits will dictate the direction of the eyeshadow application which looks fine when you are about an inch away from the mirror. Then, when you look at yourself full length, you will notice that your eyes just don't look right. You start tweaking the eyeshadow and soon you just end up with a smoky eye look for the daytime.
What is always important in eyeshadow is to remember that everyone sees you from about a foot away, and that is how your eyeshadow should be judged.
14 - To elongate the eye, take the dark brown eyeshadow. Start by marking the area first in the direction the eyeshadow should be which is up and back. I usually start in line with the bottom lashline and just mark it straight back. 15 - Depending on your bone structure, the length of the line may be longer. What is the most important here is to make sure it goes back and up, not up and to the side like jazz hand fingers!
16 - Smudge and blend that line. 17 - Front view. 18 - Taking the same dark brown, extend and smudge the bottom lashline towards the inner corner but take it below highlighted part.
19 - To lengthen the top part of the eye, use the end of the lashline and angle the mark slightly upwards because if your eye were closed, you would notice the lashline goes upward. 20 - Blended and smudged.
21 - How it looks from the front. 22 - With the same color or a different color if you like, smudge a thick line from lashline to half the lid area.
Creating Depth
Emphasizing the orbital ridge provides more depth and separation.
23 - Take the dark brown eyeshadow and start at the inner corner (and it has to hit bone which will be close to the side of the nose but not quite) follow the bone structure up and around. It should end up at the outer end of the lid. 24 - What it looks like with all the eyeshadow on so far. 25 - The front view.
26 - You might notice an area where the eyeshadow is a bit thin. Don't worry about it because it will be covered and blended. 27 - Taking the black shimmer eyeshadow, apply the eyeshadow straight upward or downward depending on which direction you start. Your guide is the outer third of your lashline. You should be just hitting the fleshy part of your eye and when you hit bone, that is when you stop. You may notice the slight "tail" in the picture. That is the area where your natural crease starts to fold because of the bone indentation.
28 - Blended. 29 - Front view.
30 - Apply the same black shimmer eyeshadow to the outer bottom third of the lashline. 31 - Front view.
Eyeliner
This eyeliner method just emphasizes the lashline nothing more. It just thickens the look of the eyelashes.
32 - Apply the black pencil to the top lashline. 33 - Apply a thin line just to emphasize the lashes onto the bottom lashline. 34 - How the eye looks with a coating of mascara.
Here is the before and after.
As always, there are variations to application. Nothing is written in stone. What really matters is if you feel comfortable with the look. Hope you enjoyed this tutorial!
*Special thanks to Meghan*


