This works on all eye shapes, the only modification needed is your comfort level in color. If you feel the black is too harsh or dark, go with a different and softer color like a charcoal. Or maybe, you like something more colorful, just substitute the black with a color like blue or green. Just remember, what makes this look wearable is the neutral or brown shadow applied to shape the orbital ridge and the understanding of makeup eye anatomy.
Prepping & Priming

1 - Prepped and primed eye.
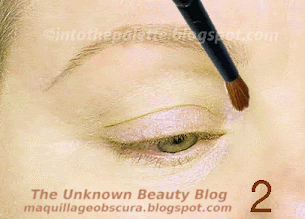
Orbital Ridge

2 - This time instead of taupe, I use a matte dark brown and a fluffy brush. I want to apply the color all over the brow bone, orbital ridge, and a bit on the crease. You can use a cream shadow instead of a powder.

3 - A different angle of the eyeshadow application.
The Indentation

4 - Emphasize the indentation by continuing the color application of the brown shadow from about 1/3rd of the outer end of the lid and continue up and meet with the orbital ridge shadow. 5 - How it should look.

6- & 7 - How it looks when the eye is looking downward and looking straight ahead. See how the eye has shape, depth, and contouring? This is why the orbital ridge is important!

8 - With the same dark brown, apply a smudged line onto the bottom lash line and continue to the side to connect upward with the previously applied eyeshadow. 9 - The look so far. Notice how this application alone lengthens, lifts, and shapes or frames the eye.
Applying the Overlay or Highlighter Eyeshadow

The overlay is really just applying the pink/vanilla shimmer over the orbital ridge and brow bone. The color can and probably should be applied all around the eye, top and bottom because it will highlight the eye area. 10 & 11 - The area marked in red shows where the highlighter will be applied.

12 - If you are applying on top of a dark brown powder, apply this highlighter softly as not to blend with the dark brown. If you applied a cream type of dark brown shadow, then you can just swipe the color. 13 - The highlighter should just soften the orbital ridge color just a touch so it doesn’t look as dark and heavy on the eyes. 14 - How it should look. The shape of the orbital ridge is still there and the brow bone is highlighted. The bone structure alone will naturally highlight the brow bone but applying this highlighter will add some luminous glow when one turns their head!
The Gold Lid

15 - The lid is colored with a metallic gold eyeshadow. This is applied just on the lid area and up to the orbital ridge. Remember, applying up to the orbital ridge and not the crease, opens up the eyes which is needed when you are doing smokey eyes. 16 & 17 - How it looks so far.
The Black Shadow
What makes this smoky eye look a bit more tame is the application of the matte black eyeshadow. It is applied to shape, lift, and open up the eyes rather than hollowing them out like some Halloween skull!

18 - Apply the matte black eyeshadow with the tip of the brush. You really just want to mark the orbital ridge with a soft line. (Here it is shown without the eyeshadow applied for a more clear view.) 19 - Continue onto the side of the eye area to mark the indentation.

20 - Remember, this is applied onto the already shaped eye, so the black shadow won’t appear as harsh since it is applied on top of the softened dark brown shadow. 21-The front view.

22 - Enclose the lid with the black shadow. This is applying eyeshadow right between the the flesh of the lid and the boney eye socket. Enclosing the lid then blend upward and soften the shadow. 23 - How it looks without the other eyeshadows.

24 & 25 - How it looks so far. The shape of the eye has been colored with the brown shadow while the black shadow sharpens the emphasis. Notice when you "enclose" the lid, you create more depth to the eye.

26 -Take the same black shadow and apply a smudged line to the bottom lash line. DON’T connect it with the top because the dark brown shadow has already created the lengthening and shape of the eyes! 27 - How the eye should look.
Soften the Look

28 -To soften the darkness beneath the eyes, apply a wash of the metallic gold shadow on top of the black. Not only will this soften the look but it will give the eyes dimension and glow. 29 -See how it brings luminosity?
Eyeliner

You can use a black cake eyeliner, gel eyeliner, or pencil. Your choice. 30 -Apply the eyeliner from the inner corner and wing it at the end to blend in with the black eyeshadow. 31- How it looks, you are almost finished.

32 - Take the black pencil and apply to both the top and bottom waterline. (This is optional.) 33 - The look so far. 34 - Apply mascara.
Before & After

The look has the smoky eye touch. The black shadow isn’t used to color the entire eye but to emphasize the shape and the beauty of the eyes. See how everything lifts up and back?
Not only are these smoky eyes ageless, the look would work in any century. I am sure Cleopatra would have loved the eyes too! (Aldona photoshopped herself into Cleopatra.)

Remember, you can do it too! Just takes some patience and practice. If you have tried any of my tutorials, email me pictures to be on The Wall of Beauty.
*Special thanks to Aldona. xoxo*