You might think if you have heavy hooded eyes or any type of hooded eyes that eyeshadow application is different. It really isn’t, just the end look may be different from the so-called “ideal” eye shape. Personally, I like hooded eyes because not only do I have them, but they have their own unique shape which brings a different perspective to how eyeshadow should look.
I used an ivory gold shimmer, peach gold shimmer, warm matte taupe, and a dark coco brown. For eyeliner, I chose a black brown.
Defining the Orbital Ridge
1 - Starting with a prepped and primed eye.
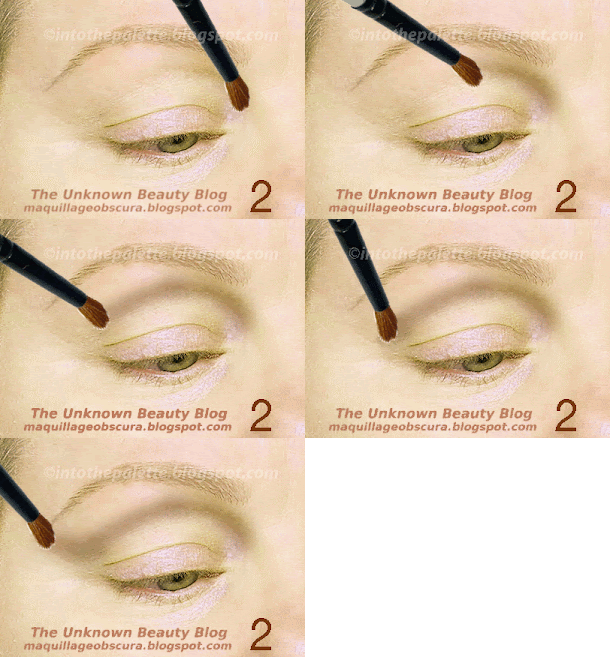
2 - Define the orbital ridge with the taupe.
3 - Blend the taupe upwards towards the eyebrow.
4 & 5 - How it should look so far.
6 - Take the taupe and apply a thick line onto the bottom lash line. This will shade the bottom lash line and also allow the other colors to stabilize and look less harsh. Apply all the way up to the side of the eye and stop when it meets the other taupe colored area. 7 - The contoured, defined, and shaped eye look.
Highlighting the Eye
8 - Take the ivory gold shimmer and apply right at the side of the bridge of the nose in line with your tear duct. This will lighten and blend the taupe and will also open the eye area. Continue up and beneath the eyebrow. You don’t want a really thick line, you just want to emphasize the separation of the eyebrow from the eye area. Go all the way around to the side of the eyes to the temple area. 9 - How it looks so far.
10 - Applying color from the front. 11 - How it looks from the front.
12 - Take the same color and start at the same place when you highlighted your eyebrow, the side of the nose. Apply all the way around the bottom eye area in a wide arc. This will soften and highlight the area beneath the eye. 13 - The glowing look so far.
14 - Take the same color and apply onto the inner corners (top and bottom) of the eye. For some of you with this type of eye, you may find your tear duct area hidden. What you actually have is an epicanthal fold, just highlight that area. Continue onto the lid about a 1/3 rd of the way in. 15 & 16 - Highlighted.
Coloring the Lid
17 - Take the peach gold shimmer and apply onto the lid area. Remember to blend it up to the orbital ridge bone. This will give the illusion of a large lid area when you blink. 18 - The eye look so far.
19 - With the same color, apply onto the bottom lash line. 20 - Looking good!
Enclosing the Lid and Adding Depth
21 - Take the dark coco brown and apply onto the outer end of the lid. The brush should rest between the bone (eye socket) and the lid. Just mark the height of the opening with the brush. 22 - Continue with the same color by guiding the brush along the orbital ridge (bone). If you are feeling just the flesh, and a hollow area of your eye, then you are too low. 23 - How it should look.
24 - Apply the dark brown on the bottom lash line just at the outer 1/3 rd and follow the lash line to meet the top. 25 - Almost finished!
Eyeliner
26 -Apply eyeliner in an ageless way. 27 - Apply the black brown eyeliner along the lash line and slightly angle it upward when you reach towards the end of the outer lash line. 28 - How it looks from the front.
29 - Apply the same color just to emphasize the lashes. 30 - The eye look. 31 - Add mascara.
Here are the before and afters of Kim’s eyes. Simple, glamorous and eye opening wouldn’t you say?
*special thanks to Kim*


