This tutorial is a request from another cult member—Emily.
Before I start, I have to say to Emily, I modified the look a bit to make it easier to explain and to work on many eyes. The pictures look slightly different but the result is pretty much the same!
For this look, you need three eyeshadows - a shimmery golden ivory, a matte dark brown, and a satin dark purple. You will most likely need in addition to the shadows a dark brown or black eyeliner and a dark purple eyeliner for more emphasis on for the eyes in real life.

I have skipped the diagrams of the Definitive Eyeshadow Guide to make the post less confusing, but generally, the steps do follow the diagrams.

1 - Start with a clean and well prepped eye. 2 - Apply the golden ivory eyeshadow from lash line to brow bone and all the way around the bottom lash line to give it a glow. 3 - How it looks.

4 - This is where you can use a dark purple eyeliner. You should just apply it onto the lash line and smudge into a thick line. 5 - Take the purple eyeshadow and top the liner and blend upward just onto the lid and no further. 6 - The look so far.

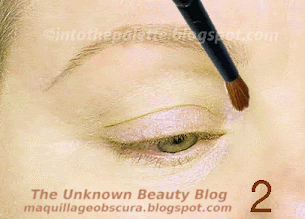
7 - Notice the markings of the eyes. These are where the orbital ridge meets with the bone indentation at the side of the eye. 8 - First, take the matte dark brown eyeshadow and enclose the lid. This creates depth to the eye. This is done on the fleshy part of the lid. If you place a brush on the end of the outer lash line, it will sit right in because it will hit bone. 9 - Mark that area with the brush.

10 - Color the orbital ridge. Next is slightly tricky but if you allow your brush to travel upward, it will hit an indentation. 11- This indentation is what makes the crease fold over the lid. Guide the brush into the little indentation. 12 - How it should look so far.
CLOSE SET EYES

13 - If you have close set eyes, apply more of the golden ivory eyeshadow in the area shown. This will open up the eyes but still have contoured definition. 14 - How it looks on close set eyes.

15 - How it looks so far.

16 - Apply a dark brown shadow or liner to the bottom lash line but don’t apply the tear duct area. You want that area to have that glow from the golden ivory eyeshadow that was applied in the very first steps. Also, the eyeliner shouldn’t be a harsh line but a soft one. As soon as you hit the end of the eye, go further up. 17 - This again will lift the eye in that area by creating the illusion of a more squared off outer corner. Just blend it in with the enclosed lid eyeshadow.

18 - How just the dark brown eyeshadow looks. 19 - How it looks so far.

20 - You are almost finished. 21 - Just add some mascara and/or lashes.

Here is the complete eye look. See the before and look at the afters. The eye has depth and the eyeshadow “wing” sweeps the eye back. Pretty, glamorous, and fabulous!
I hope you found this tutorial helpful.
*Special thanks to Aldona who will be back! And, Emily, I hope I didn't stray too far from the original!