I like to mix my textures because for one, I just don't like eye primers that much anymore. They may make powder eyeshadow long lasting but on mature eyes, the wrinkly crinkly shows up more. Two, powders alone will not have that textural look on the eyes, they end up looking flat on the skin. This is where creams come in. You may be saying they will crease. Well, yes if you don't set them or if you use too much. The key is always layering.
First of all, with this method, the eyes are made up first which means, foundation is applied AFTER!!!! Applying foundation after is always good since any fall out from the powder colors can be wiped away and covered. Eyebrows are also drawn after.
Here we go, first with reverse concealing.
I introduced this method with the MaqPro Concealer Palette. Reverse concealing is working with your dark circles. It is easier to layer lighter colors on dark than to neutralize them with the lighter colors. I used my Kryolan Paint Stick in V27 which is a dark stick of color. The darkness is okay since it will be lightened (sculpted). The color is applied all over the eye like a raccoon. Yes, this is one time you can be a bandit!
Sculpting with concealer is next.
See how I apply the concealer on my browbone and onto the side of my nose and the outer end of the eyes. I also apply onto the inner corner and on the bottom area.
Blended, the dark brown looks like a taupe and you see the shape of the orbital ridge. It doesn't look like much but it will get there!
Ivory Shimmer
I applied an ivory shimmer to my browbone and bottom lashline.
I apply shimmer onto the lid and up until I hit beneath the orbital ridge bone.
Enclosing the Lid
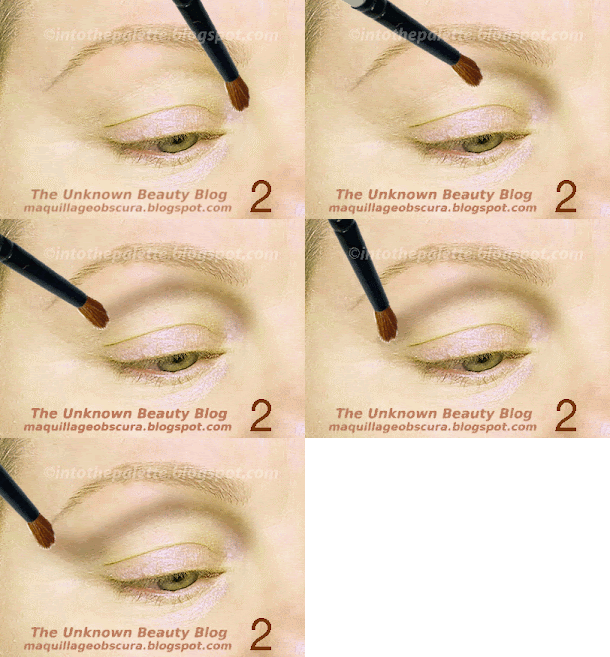
Enclosing the lid is to darken the very end of the fleshy part of the lid or the eye socket.
Continue with the same color up and around the orbital ridge. (Use your best judgement on how far you want to go with this line. I stopped mine about 2/3rds of the way around.) Your brush will follow the bone structure. Remember, to tilt your head back slightly and to look down without raising your eyebrows. Don't be surprised if the line goes up pretty high.
Apply the eyeliner on both top and bottom. (I used a dark brown for more subtleness.) Apply the eyebrows and finish with the entire face with foundation. Any fall out from the eyeshadows will be wiped away. Apply more highlighter beneath the eyes and cheekbones if needed.
The Finished Look
This method and look works on all eye shapes and all ages. (It doesn't look bad on my close to middle aged eyes, does it?) If you are wondering if it creases, it doesn't on me. I have done this during the hot summer months also and haven't had problems with creasing or the wrinklies!


