Here are the colors I used and yes, the basic colors of taupe, fleshtone peach, dark brown, and black were used and as the guidelines. For the "accessory" colors, I used NARS Alhambra - the darker side; Maybelline Color Tattoo in Bold Gold, Urban Decay Creed from the Naked palette, and a black pencil.
1-Using the taupe, I contour and define the eye area. 2-Blend to soften. 3-Since this is a smoky eye, I use a dark brown to contour the outer end. 4-How it looks so far. 5-The color stops right before it hits my browbone. 6-Blend. 7 & 8-How it looks blended at different angles.
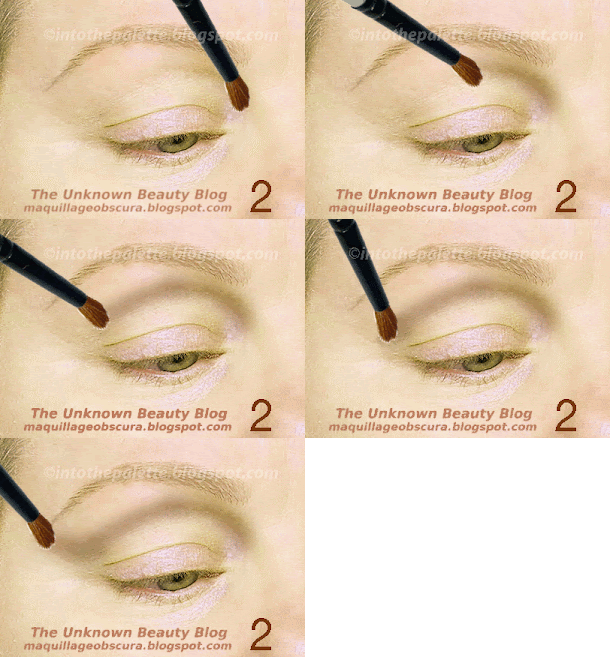
9-Taking the dark brown, shade the orbital ridge. (If this weren't a smoky eye, a medium brown for the daytime eye look would be used here or a taupe for that no makeup look. This is done because it gives continuity to they eye by shading the area between the lid and browbone. The lid area won't look so small and separated from the rest of the eyes. Look closely next time when you watch your favorite TV show.) 10-Blend. 11-Blended. 12-This time the lower corner of the inner lashline will be emphasized. This actually elongates the eye in a modern way. Very flattering for Asian eye shapes as you can see on Bérénice Marlohe. 13-The little point. 14-Continue and color the lower lashline.
15-Now, the eyes have their basic guidelines. Depending on eye shapes, everything may be covered with the other colors. Me, since the area between the lid and my brow is wide, the brown will be visible. 16-Apply the fleshtone peach on the browbone. I don't want a sharp contrast between the orbital ridge and browbone since the emphasis will be on my lid area with the shimmer. 17-Apply the Maybelline Bold Gold eyeshadow onto the lid. Make sure it extends beyond the inner corner of the eye. 18-Top it off with NARS Alhambra powder shadow. 19-How it looks so far.
Next is the slightly difficult part because the application used is to create depth and dimension. 20-With Urban Decay Creep I mark a line which is really on top of the dark brown line I applied in the first steps. 21-A darker application. 22- How it looks so far. See how it lifts upwards? 23-Taking the same color go over that line again and blend it towards the eyelid, stopping right before the bulge of your lid or about a ⅓ of the outer edge of the eye. 24 & 25-What it looks like so far. Doesn't look anything like a sultry smoky eye. 26 & 27-The angle of the shadow goes upward. If it doesn't, you applied it by thinking your eye just faces front. It doesn't, it curves around and that is how the eyeshadow should be seen.
28 & 29-Take the same shadow and I am applying a little bit over my lid so that when my eye looks forward the dark color will disappear into the crease. (Usually I would apply the color higher but this is for an entirely different effect.) 30-How it looks so far. 31-Different angle. 32 & 33-Blended and softened.
34-Take a black pencil and line the upper lashline. 35-Stop right at the outer end. 36-Apply onto the bottom lashline. 37 & 38-Smudge the eyeliner.
39-This is the important part. It is basically a winged liner. I am emphasizing the lift a bit more by applying the matte black shadow. 40-How it should look. 41- Go over the liner with a matte black shadow and don't forget to emphasize that point at the inner corner. 42-Smudge more shadow but this time with the Urban Decay Creep. 43-See as I look down the angle of the eyeliner from the bottom to that outer top end just sweep up? 44-Go over the top and bottom waterline with black pencil. 45 & 46-The finished smoky eye and different angles.
Spamming you with my sultry Skyfall inspired smoky eyes!
This eye look should work on practically every shape eyes. Hell, if I can do it on my eyes, anyone can do it on theirs! Hope you enjoyed this tutorial! If you have any questions, just leave a comment below or email me. And please, a mention of this blog is always appreciated and/or get my badge. Check out my Wall of Beauties, too!


