This tutorial is for those who are very wise and beautiful beyond their years, the wise owl crowd. Of course, these techniques are easily adaptable for anyone of any age. I just think many techniques and looks are just made for a very young crowd. Beautiful makeup, especially on the older generation should just enhance true beauty, never overpower. One of the best ways to do that is with Skin Illustrator products.

What was used in this eyeshadow tutorial were four powder eyeshadows: a soft matte fleshtone pink; a matte medium brown, a shimmer cream pearl, and a dark purple (used wet) as a soft eyeliner. All these colors are from the Stilazzi collection.

With these powders, the most important product used were the Skin Illustrator Gel in Character 2.
Skin Illustrator Glazing Gel is just that, a gel. A little bit should be squirted out onto a ceramic tile or some plate where you can swirl the product around. Your hand won't work because it will dry onto it. Once you think enough is on brush, apply. There is a slight learning curve but once you get it, there is no going back!
Prepping the Eyes

1 -Here, the eyes of Olivia Sr. have been prepped. 2 - I used a highlighting cream as a base instead of the usual matte base eye base. Much more mature friendly and gives the eye area a glow. 3 - All glowy and ready!
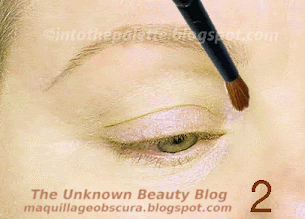
The Glazing Gel that Defines, Divides and Contours
The pictures show the where and what direction the gel should be applied. Make sure to apply the color all over the browbone and onto the orbital ridge. The bottom pictures show the action of application which can miss some detailed parts.

Character 2 Glazing Gel is a contour color for most skin tones. It doesn't look super dark but that is just an illusion, the color does show up and in the most natural color. This is also a great product to use on deep set eyes. 4 - If you prefer not to contour the nose, it can start right at the inner corner browbone. It is okay to color the brows with this, it will actually aid in darkening the brows. 5 - Follow the brow line, doesn't have to be precise. 6 - This shows the pattern for contouring the nose. The color can go beyond the browbone and to the side. It will work as a shadow since that is what this color is supposed to be. 7 - Continue onto the bottom lash line.
Emphasizing the Orbital Ridge & Others
Usually, it is easy to start at the ends and blend in the middle, just a preference. This one uses just a simple medium matte brown.

The orbital ridgeis a bone. It isn't the crease which falls way below the ridge. If you follow your crease, you will be making your eyes looks smaller. The orbital ridge is the guideline for eyeshadow application! 8 & 9 - Start right at the lower indentation. Mark it with the brown eyeshadow. 10 - Mark the inner corner, see how the brush hits the bone. That is where you want the color. 11 - Blend the ends by meeting the color in the center.
Opening Up the Eyes with the Bottom Lash Line
With the same brown shadow, the bottom lash line is lined but slightly differently to open up the eye area. Notice how the line slightly drops lower when it comes to the inner corner. Leaving this area alone will open up the eyes a bit more.

12 - Starting at the outer end of the bottom lash line, color and follow but don't let the brush curve into the tear duct area. 13 - See how the brush falls below? 14 - The end result, just a slight smudge of brown which doesn't close up the eye.
The Lid Area
For the lid area, a soft pearl cream shimmer is used. You can replace this with a color you prefer. I like to use a shimmer in this area because it brings some lights to the lids.

The lid area is larger than you think. If you color too little of a space for the lid, it will make your eyes looks smaller. You don't want that! You want your eyes to look as big and wide open as possible. 15 - Starting from the inner corner, apply the shimmer. 16 - Continue again by following slightly beneath your orbital ridge. 17 - The shimmer finish on the lid.
Highlighting the Brow Bone
For this tutorial, a simple approach to highlighting the brow bone compared to the Bewitching tutorial. Of course, you can do it the other way, it is more about highlighting the entire eye area.

Not shown but shown in the diagram, with the matte flesh tone pink the highlighting really starts right where the brush is level with the tear duct and hits the side of the nose. 18 - Moving up and around with just the tip of the brush. 19 - Start following the brow shape and hit the arch. 20 & 21 - Once you hit the arch, that is a sign to turn and move down towards the side.
Enclosing the Lid
Enclosing the lid is an important step. Just like separating the eyes from the rest of the face. You are separating the fleshy eye area from the bone area. The true start of the fleshy area is really almost perpendicular to the last bit of the outer lash line.

22 - Taking the dark purple, either wet or dry, allow the brush to sit perpendicular and mark that area and blend it a bit to get rid of the harshness. 23 & 24 - Bring the line around and start working the top lash line. The part not shown but shown in the diagram above is the lower outer corner. Just color the outer third to create a soft shadow in that area.

25 - Add a some soft defined emphasis to the brows with a brow pencil and add mascara. Then spray with Blue Marble Selr to amp up the color and seal the look all day!
The before and afters of Olivia Sr's eye look! Notice how softly emphasized her eyes are with eyeliner. Nothing closes the eyes up. The Glazing Gel may look hidden, but depending on the angle and how the lights hit, the contour and definition shows up as a natural shadow. Nothing cakey or dry! Just enhancing true beauty!

Hope you like this tutorial! Until next time, get yourself some Skin Illustrator products because they ROCK!