


For this tutorial Lisa from Beauty Info Zone has volunteered. Give her a round of applause!
In this tutorial I hope you can see how to define, divide, and conquer! Watch as Lisa's eyes go from a basic weekend to professional daytime to an alluring and seductive night time eye look with just little changes. Knowing the basics of eyeshadow and what little changes can do can make the biggest difference in the look of the eyes as a whole. Hopefully, this tutorial can open your eyes (pun) and paint a clearer picture of past tutorials.

Lisa has hooded eyes and as I mentioned before about hooded eyes, when her eyes are relaxed and open, her crease is hidden. Unlike Asians where the orbital ridge is out in the open. Also, Lisa will still have the shape of the fleshy area of the lid and crease when the eyes are closed whereas Asians do not.
Weekend Look

The corner of the eye has been marked in the red lines. Usually this is marked by the end of the eyebrow and where the arch starts. Now, this can vary because some eyebrows can be shorter and some may not have prominent arches. The way I see it, the skull or facial structure begins to turn the corner and become the side of the face.

1, 2, 3-In between the red lines I marked the "corner" of the lid area up to the orbital ridge in grey. The yellow marks the area that can make the eye look droopy. (I know I have said these two things many times, but repetition is a way of learning.)
Remember these major tips: Tip #1-Rather than raising your brows up high to mark the orbital ridge, it is better to relax the eye muscle and lift with that area with the finger. This really makes a difference in how the color ends up on the eye when it is relaxed.
Tip #2-Remember to use your orbital bone as a guide to mark the orbital ridge. Let the tip of the brush follow the bone and not the lid.

4-As one gets older and I am talking from experience, I find it easier to first mark the orbital ridge with a line. 5-blend it out onto the orbital ridge. 6-3/4th view of the blended color. See how it stops right before the yellow area? When you do this to yourself, put a kleenex lining up the outer corner of your eye and the outer end of the brow. If this is too hard, then practice with a piece of scotch tape. (Void this practice if you have allergic reactions to the tape.)

7-The orbital ridge is marked. I like to enclose the lid area to give the eye the illusion of depth. This is the grey area. Like dividing the brow bone from the lid area, this divides the lid from the side of the eye area (which eventually is the mature and wise area for many people.) 8-Different angle. Notice the shadow does not fall into the yellow area. (The gravity of nature will do that for you. And, if you still have perky eyes, well just you wait!) 9-The areas of the eye is divided. See how that simplifies application? Now you know where to apply the lid color and brow bone color. 10-For the weekend look, just swipe the lid and brow bone area with a soft light ivory beige.

11-I put the yellow guide back in just to show you how I put on eyeliner. Since this is the weekend look, I just pick a basic dark brown eyeliner. With the yellow guide showing, I apply the eyeliner from the inner corner and curl it up right into the corner of the eye, only slightly since it isn't a winged liner look. Why do I do this? On mature women, this little curve does wonders. It emphasizes the "corner" of the eye and never runs into that yellow area. Note: Doing the top liner this way also trains you to go against gravity. If you followed the curves of eyes just the way you see them, everything will just go downward. 12-With the eyes closed, the liner follows the natural eyelash curve. 13-Finish off by lining the bottom lashline with the contour shadow. Add some mascara.

Daytime Look

Tarte Highlighter in Champagne, Revlon Colorstay Plum, Viseart Shadows, Tarte Shimmering Smoky Plum
The weekend look is pretty basic, almost the no-makeup makeup look. Now, let's take her to a daytime professional look. I always like a touch of color, nothing radical just wearable and enhancing.

14-Go back to the step where the eye area has been divided. 15-Using a soft shimmery lavender, apply onto the lid area. 16-Then apply a champagne beige to the browbone. This is a light shimmer and catches the light just enough to give it a luminous glow.

17-3/4th view. 18-Next is the eyeliner, I picked a nice purple for daytime. The yellow shows the area to avoid. 19-I curled the end of the eyeliner again.

20-Smudge the liner and the curled end. The curled end should blend into the corner shadow color seamlessly. 21-Smudged and blended. 22-For the bottom eyeliner, I like to keep it a neutral brown since there is enough color for daytime. Like the weekend look just take a dark brown and smudge.
Voila! The polished daytime look.

Night Time Look

Let's say Lisa suddenly gets a call that she has a hot date with Daniel Craig that night! (We won't tell you are married and we won't tell Rachel about this date either!) She needs to change her make up quickly for a night time seductive look.
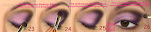
23-Take a dark shimmery purple and apply on the corner of the eye. 24-Next apply onto the outer corner of the orbital ridge and about halfway inward. 25-See the "v"? 26-This is where I want to extend the "v" or create a (fish)tail. Remember, it is a light brushing of color so use what is leftover on your brush.

You're almost done! You just need the black eyeliner. 27-Take the pencil and apply it to the top lashline and curling it into the corner of the eye. Don't worry about this tail, it will be smudged into the purple. 28-Smudge the line and the tail end until it is blended into the purple. 29-Do the same to the bottom.
Add more mascara and WOW!

There you have it, simple changes that make major impact. Hope it wasn't too difficult but like all makeup, playing and practice time is needed.

Thanks again to Lisa! xoxo


