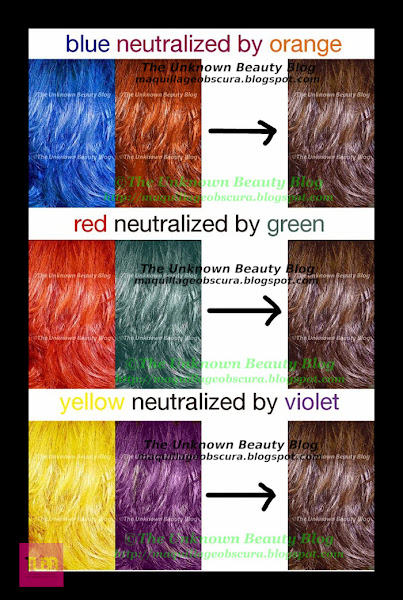
My first post explained how your hair has all the primary colors of blue (B), red (R), and yellow (Y). Mix all these together and you get brown (N). Your hair is always a brown: blue brown, red brown, or yellow brown. Brown is the important color in haircoloring. It is neutral territory and achieving this color to get to another color is the goal!
Remember those secondary and tertiary colors? These are important because they help make hair into brown.
Secondary colors of violet (V), orange (O), and green (Gr) are a mix of the primary colors.
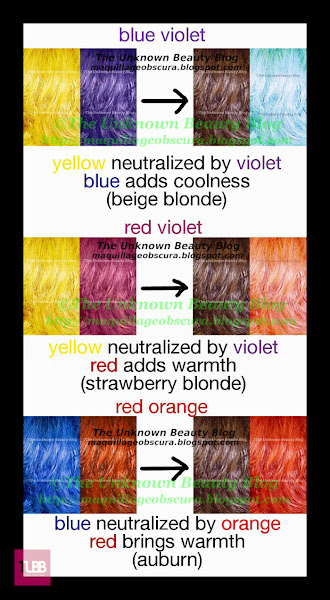
Tertiary colors of blue violet (BV), red violet (RV), orange red (RO), yellow orange (YO) (aka as gold for some brands (G), yellow green (YGr), and blue green (BGr) are the mix of the secondary with the primary.
Just remember this, primary colors neutralize and tertiary colors neutralize AND add color.
To Be and Not to Be
Okay, so you know your hair’s condition and the level of your natural hair color. You learned a little about color theory. You know a bit about developer volume.
Now get this, when you are changing your natural hair color to a lighter level, you are lifting your hair color (aided by the peroxide) and depositing color back into your hair (aided by the hair color you have chosen).
Lifting your hair level means you are changing which pigments remain in your hair. Remember this?
- Level 1-Blue
- Level 2-Blue Violet
- Level 3-Violet
- Level 4-Red Violet
- Level 5-Red
- Level 6-Red Orange
- Level 7-Orange
- Level 8-Yellow Orange
- Level 9-Yellow
- Level 10-Yellow White
Déja vu! Yes, you saw this in Part 3. They are the pigments which make up your hair in each level and when you start to lighten, you will notice certain pigments will leave you (*cries*). This is the Remaining Pigment Content in your hair or RPC to simplify.
Notice how the blue (B) leaves first. Remember, this is the only cool-toned pigment. Your hair is left with warmth and some more than others. The red (R) is a strong one and for some of you, where all the problems start. Yet, there are those with very little red and they will just go to the yellow (Y) levels.
I bet you are more confused by now and your head is spinning and you just want to spit out pea soup!
Let me make this simple. Let’s say you want to go from a Level 4 (Dark Brown) to a Level 6 (Light Brown). Checking the chart (see at the end of this post) you are lifting 2 levels, therefore you need a 30 volume developer.
You are going from a Red Violet (RV) level to a Red Orange (RO) level. Notice the reds in both levels. Also notice the violet will leave your hair. Violet is made from blue and red, this means the last of the blue is gone. Blue happens to be the strongest, darkest, and cool tone pigment. You are now entering the warm zone.
Okay, so you lifted your hair to the Level 6, now which direction do you want to go?
- More Red (R)?
- Copper (RO)?
- Neutral (N) (the natural warmth will be enough)
- Ash (B or BV)?
If you want to go more red, pick a color at Level 6 with an (R) tone to enhance the reds. For Copper, pick more of an red orange (RO or brands will say Copper) tone to enhance the red orange in that level. Maybe, you find the lift to Level 6 enough to give you the warmth of the red orange and do not want it any warmer; choose an (N) color.
Maybe, you don’t want much of the warmth. You will have to neutralize the warmth and cool it down. Red is neutralized by green (Gr) and blue (B) which left your hair will cool it down. Therefore, a GrB tone would make your hair color an Ash brown.
Just a note: Sometimes the warmth is just overpowering and to really cool it down, you will have to get rid of as much warmth as possible to achieve the desired cool-tone effect. This is usually done with bleach. (This will be covered in a separate post.)
You see the pattern? It is just a common color theory.
Going Darker
Going darker is easier unless you have grey hair in terms of correction. For this moment let’s just skip grey (you will have your moment in the spotlight). Basically, you are putting the missing pigments in your hair. A suggestion would be to go a level lighter than the actual level desired especially if you are going from a blonde to a dark color. This will be less shocking to the eyes. At a darker level, any color will look darker than usual. If it is too light, just go for the darker level next time.
Let's say you want to go from a medium blonde to a dark red. You are going from a Level 7 to a Level 4. You will be adding the red violet pigment back into your hair.
Since you are going darker, the result would be a brown with a soft red tinge. (Ignore the strawberry blonde label on the picture for this moment.) See how easy that was?
All you really have to decide is the volume of developer. Usually 20 volume is the norm. This will give a lasting effect and also ensure the change in tone.
However, if your hair is porous 15 or even 10 volume may be your best bet. This will deposit color. It will be less damaging. Or go with a demi permanent formula instead. These contain absolutely no-ammonia (more gentle) and will only deposit color which is what darkening the hair means.
Haircolor Application
Once you know which haircolor to apply. Now, you need to know how to apply it. Yes, application can make a difference.
Divide the hair into the back and front then divide the back half in half and the front half in half. You will have four sections if you at your head from above. Start with the back of the head first since this is the darkest. I usually start at the crown some prefer the nape of the neck.
Have you never ever colored your hair before? If you never have, you have virgin hair. Divide the hair into 4 sections. Start with the back section. If you use a haircolor that is lighter than your natural haircolor, apply the haircolor about 1/2" to 1" away from the scalp. After you have done the entire head this way, let it process for about 15 minutes. Then apply the color onto the roots and the ends of the hair and process for an additional 30 minutes.
It is done this way because the scalp carries heat, and heat will lighten the hair faster. This is why sometimes, your haircolor ends up lighter at the scalp than the rest of the hair.
If you have virgin hair and are going darker, just apply down to almost the ends let it process for about 25 minutes and apply the rest to the ends for another additional 10 minutes.
Retouching is a bit different. First you should spray in some leave-in conditioner on the previously colored part. Next, apply onto the roots and process for about 25 minutes. Then apply to the ends of the hair and process for an additional 10 minutes.
A major suggestion when coloring your hair, stay out of the draft of an air conditioner or heater. These will change your results.
Do you get it? Is your brain just buzzing? I know this is a lot of information but this is basically what goes into a basic single process (no bleach) color.
Next post, the fabulous greys!
*Disclosure: I don’t claim to be some great hair guru. I just like to explain difficult beauty stuff.


