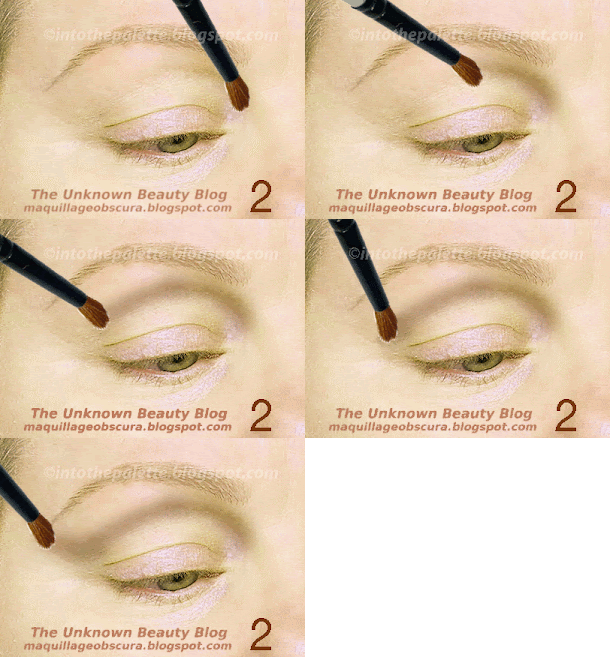
If you check out the GIF, you will notice the difference between tauped and not tauped. I hope the tutorial explains and helps some of you in understanding more about shaping, defining, and contouring the eyes without looking like some floozy from a 1970's cop show!
For this tutorial, I decided to do a soft eye look. You will need four eyeshadows: shimmery gold, shimmer dark pink, sable brown, and an espresso brown. For an eyeliner pencil - a blackened brown.
And, don't forget the most important eyeshadow of all -- a matte taupe. Your choice of taupe will depend on what you are comfortable with.
Everyone should have gorgeous eyes which look like their own, individual selves. Everyone should feel comfortable with their eyeshadows. If you like neutrals, stick with the neutrals. If you like to add some color, go for the color.
In this tutorial, I have used Lola's eyes. The eyeshadow application is easily adaptable for many eye shapes and is especially important for mature eyes. Definition without harshness is the eyeshadow technique for mature eyes.
Starting with a clean eye. I mark the side of the eyes with the taupe from the outer end of the top lash line up to the eyebrow. This not only creates the illusion of lift to the eye, it also separates the eye from the rest of the face. The third picture shows the subtle shading from the front view.
Next, create depth to the eye socket. Take the taupe and apply to the outer end the lid. It should be applied only to the fleshy soft part of the eye and should stop when it hits bone. Apply to the inner corner following up to the orbital ridge. Next apply the taupe onto the orbital ridge by shading it from the side of the nose in line with the tear duct all the way to the opposite end.
How it looks like so far with the eyes closed and opened. See how the eyeball area (lid) has been defined.
Apply a thick line of the taupe shadow onto the bottom lash line. This also creates depth. If you elongate the application beyond your natural eye shape, you will create the illusion of length to the eyes which is helpful if you have round eyes. The finished eye look of "getting tauped".
Browbone
Pretty self-explanatory.
Take the shimmery light gold and apply onto the browbone. Here, I show it without the other eyeshadows for a clearer view. You see the front view with all the taupe definition.
Lid
Take the shimmery dark pink and apply all over the lid.
Take the color beyond what you see as your lid by applying it onto the fleshy part of the eye. Stop when you hit the bone areas of the eye. (This method is also important if you have deep set eyes, the light lid color will brighten the crease area. Anything within the boundaries of the bone area is your lid!) See how it looks so far with the taupe and eyes closed. The third picture shows the look with the eyes open.
Take the same color and apply onto the bottom lash line.
How the eye looks like so far from the different angles.
Orbiting the Ridge
In this step, I am actually combining two steps in one: defining the orbital ridge and enclosing it.
The eyeshadow starts right at the edge of the outer lash line; the brush will lie in between the fleshy lid and the bone of your eye socket. Just follow the shape of that bone all the way around which is your orbital bone. Don't hit the soft flesh or you have gone too low. You want to define your orbital ridge. I color the orbital ridge about ⅔ of the way around. This is just a preference. You can go all the way around if you want. I stopped because the eye is already defined by the taupe eyeshadow and I want the pink eyeshadow to make the eyes look open.
How everything should look so far.
Enclosing the Lid
Enclosing the lid just gives the eye more definition.
With the espresso brown, starting right at the outer lash line and staying at that angle, swipe the color straight up until you hit the orbital bone.
Take the same color and apply to the outer bottom lash line. I usually stop when it comes in line with the eye ball. The second picture shows how that alone creates more depth to the eyes. The third picture shows how everything is coming together.
Eyeliner
With the same espresso eyeshadow, draw a thick smudgy line for lining the lashline, The outer end should just blend in with the "enclosing" of the lid. See how it looks so far? Not bad!
Take a blackened brown pencil and just line the upper lash line. There is no fancy winged eyeliner method for this. However, I do line the upper and lower separately and without connecting at the outer end. Why do I do this? The illusion of depth has already been made with the taupe, the orbital ridge eyeshadow, and the enclosing of the lid. No need for encircling the eyes. Take the same pencil and line the lower lashline and waterline (Optional).
Here is the finished eye look. Just add mascara.
Is taupe necessary? Which looks better to you?
A soft eye look that is well defined without any harshness of super dark eyeshadows. See what a difference taupe eyeshadow can make?
Special thanks to Lola!


