There are a few details in eyeshadow application which can really make a big difference in the end result of a complete look. I am not just talking about the eyes but how it will balance out you as a whole.
As I often mention, people will not see you as up close as you do when you apply your makeup; they see you from afar. This is how you should judge your make up from a few feet away from the mirror. If you eyes look small when you look at yourself from a certain distance, it is because you applied the eyeshadow to look good only two inches from your face.
Your orbital ridge is the important area in your eyeshadow application. Your orbital ridge is the bone (ridge) that slopes from your browbone and into your eye socket. In eyeshadow application, this bone defines, contours, and creates depth. For me, the orbital ridge is different from the crease because I consider the crease to sit in the fleshy part of the eye, the part where most people will apply their darkest eyeshadow color to define. And, this is where eyeshadow application runs amock!
Notice in this diagram (which is explained further here), eyeshadow has to sweep and lift the eye upwards. This is very important for everyone and especially if you aren't a spring chicken. You don't want to cluck away without looking good, right? So what are the basics or the little details that will sweep and lift the eyes? Glad you asked!
For starters, you should know what the important details or guides for eyeshadow application. These aren't difficult guides except for maybe the one which is start of the winged eyeliner.
Bottom Line Guide
I call this a "depth mark" just because it creates the illusion of depth to the outer end of the eye. This is how it would look on several different eye shapes.
The line starts from the bottom lashline, about 1/3rd of the way in then extends upward and it should hit an indent (which is actually the area that folds the skin to create the crease when you blink) of a bone.
Top Line Guide
The diagrams show them in two ways, as a liner and smudged. I also call them "depth marks" because like the bottom ones, they sweep around the eye and create the illusion of depth. You will notice the top one is how a WINGED EYELINER starts. Smudged, it is just a guide for eyeshadow.
Here, on various eye shapes including Asian monolids (yes, you can do winged eyeliner!), the line starts right after the bulge of the eye (or center of the eyelid) and extends towards the indent. The next picture will show the calculated result better.
See how the two will meet at what is the indentation of the eye? You can see in the picture of my eye, how I started the line.
WHAT NOT TO DO!!!
Next is the step that occurs pretty much naturally for most when doing eye makeup, following the crease. Why do you do this? Because it feels natural. After all, the indentation of the eye, as I mentioned, creates the fold or crease of the eye.
Only to look like this:
Unless you want your eyes to look like your belly button from afar! This will actually close up the eye and leave your orbital ridge empty which will make your browbone area appear to bulge out or have a lot of space. I see this often in Asians; the lid area is nicely made up but the rest is just empty. The frame of your eyes goes all the way up to your eyebrows. You have to make the most of it or your frame is just incomplete!
This is how it should be done! The Orbital Ridge
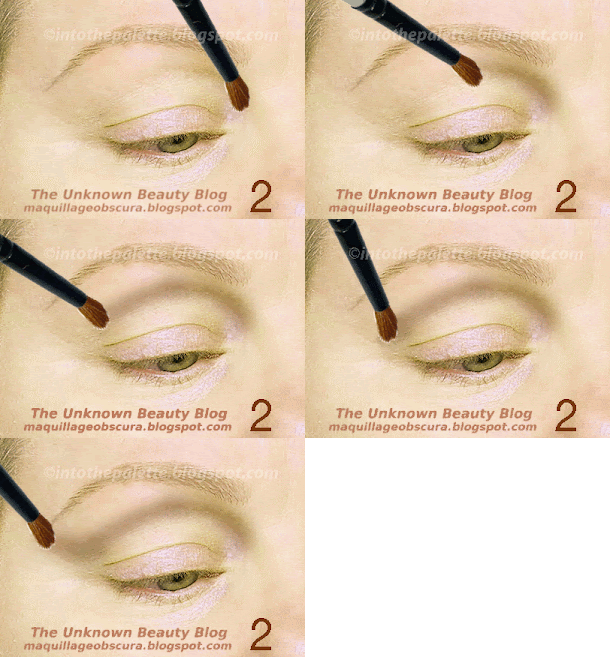
First, extend the line. Just extend it straight up and beyond the indent. You will hit bone and it will be a major one for it is your browbone. This is also the widest part of your orbital ridge.
Next, bring just draw a line or you can use a soft brush and just bring it around as shown in the pictures. You can see on my eye how far up it goes. Only a little sliver is left for the browbone.
What it looks like blended on all the different eye shapes. See the difference?
Here are various looks on how this method looks on my eyes. The top pictures define the orbital ridge while the bottom, well you know just by looking. See in the bottom pictures, my eyes look small and not to mention the space above looks like my eyes are bulging!
And here is a smoky eye look. Nothing too stark and dark. Just smoky!
Hope this post helped some of you. I know the method may be unconventional or different from what you are used to but remember, makeup is all about illusion. Just try it and see the difference!
Any questions, just leave a comment below or email me.
Special thanks to Kim, Lola, Lorin (The VeganAsana), and Susan!!!


