The Mad Men television series not only is an excellent and well written show of the 60's era, it has also influenced the fashion and beauty industry. For some of us who are old enough to remember, the fashion is remarkable replica of that time but with a bit of that update for today's television. Same with the makeup, classic and very 60's with the winged eyeliners, the look has been updated to suit the vision of today's modern audience. One character that continuously gets remarkable attention for her personality and looks is Joan Holloway (Harris).
Through the seasons, Joan Holloway's makeup has evolved from just a secretary to a more daring yet timeless retro look that is both classic and refined.
Eye Anatomy for Eyeshadow Application
This look involves some careful thinking which I know you will get. It also takes understanding your eye anatomy. This is why I separated the explanation of the shading of the orbital ridge. Hopefully, it has familiarized you with the important areas of the eyes because those will act as guides in this post (and in most eyeshadow application techniques).

In these pictures, Joan Holloway's eye make up isn't exactly that simple secretary look any longer.
Here, I have enlarged the pictures for a closer look of the eyes. The crease has been emphasized a lot more by that "cut-the-crease" look yet the entire look never strays from that conservative and polished office-look. Very fascinating!
Brelki has volunteered her eyes for this post.

1 & 2-Start with a smudge-proof eyeshadow base that also will double as the browbone highlighter.

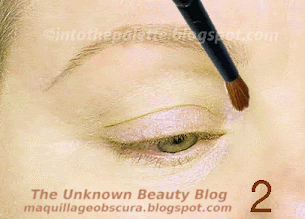
3-Medium satin matte brown. 4-Apply the color onto the orbital ridge.

5-Different angle. As I mentioned many times, this color acts as a guide for the placement of other colors. 6 & 7-Take the same color and make a smudgy line on the bottom lashline starting right after the tear duct.

8-Soft shimmery light blue for the lid color. 9-The pink line is the boundary of the lid color. It starts from the outer lashline up to the orbital ridge. 10-Apply onto lid starting from the inner corner of the eye. See how the brown acts as a placement guide for this color? 11-Apply the same color onto the bottom, around the tear duct area only. Stop where the smudgy brown shadow has been applied. 12-What it should look like so far.

For this color take the same color used to define the orbital ridge but with a stiffer brush. 13-Or you can take a pencil in a similar hue and apply it with an eyeliner brush to cut the crease. To practice, I would use the first method since this isn't going to be an easy one. Once you get confident, go for the budge-proof options like long lasting pencils and gel liners.
This is the difficult part because it involves understanding where the guides on your eyes are for the placement of the line. If you notice in the pictures of Joan, there is a little "wing" that is formed to give that elongated shape to the eyes. Knowing where to put that is the difficulty of this tutorial.

Once again I will show you the anatomy of the eyes. 14-The area that I marked in green is the bone structure that creates the crease. If you feel it on your face, you will fill your orbital ridge slopes into an indent that leads to the side of your face. There is a slight hollowness there. That is one of your guides.

15-Here, I show it on Brelki without the lid color for a much clearer look, and I also kept the pink guide. 16-A different angle of the guides. What has to be done is to draw a continuous line with the two guides. You are probably wondering how to do it. There are two easy ways. 17-First way is to take a triangular sponge or a folded kleenex and apply it on the side of your eye from the outer lashline to that hollow as shown. 18-Second method is to take an angled eyeliner brush and mark area lightly.

19-What it should look like. 20-Continue that line until you hit the hollow area of the eye green. 21-Marked and ready.

22 & 23-Different angle with and without guides. Phew! The hard part is over!

24-You can take it from any direction you want. Just finish up the line and extend it into the side of the nose. You might have to add more color or blend it in more at the outer end, as you see fit. 25 & 26-The crease emphasized.
The top eyeliner is the basic winged liner. 27-Black gel liner. You can also use a cake eyeliner or liquid eyeliner. Whatever your preference. Once again, I will go over the winged eyeliner technique for Brelki's eyes.

28 &29-Taking all the color away and deepening the contrast to show what I look for as guides to a winged liner. With a clean lid. You can faintly see a line which is the last fold or the lowest the muscle of the orbital ridge will fall. 30-Here it is emphasized as a blue line.

31-To start the wing of the liner, mark a line from the that line to the outer lashline. 32-Go back to the top and mark a triangle by going straight down.

33-Fill that triangle in. 34-Continue to the front. 35-Narrowing the line as you get to the inner corner. 36-What it should look like so far.
The bottom liner is what is left and you can see in the pictures it wings up. This is easier than cutting the crease.

37-Using the same color used to cut the crease, start at about 1/3rd of the way into the eye from the outer corner. I put back the green guide just to show where it is going. Just follow the bottom lashline to the end of the outer corner and straight up. Stop before it hits hard bone. (This is the reason why I like to do the bottom liner from the inside to outer end because it follows the angle of the lashline and not the habit of the hand going straight out flat to the side.) 38-Without the guide. 39-Front view.
Add some lashes or for a retro feel, try a cake mascara.

I know this isn't an easy one and I tried to explain it the best I could. Hopefully, you will understand it a bit and be inspired to try the look. There is some practice involved but I am confident that you will be able to do it. I can't say these are the exact methods used for Joan's look and the steps are there to expand your mind to work on application techniques. Remember, if you get frustrated, quit. Makeup should be fun!
Hope you liked this Mad Men inspired tutorial. Enjoy until next time! :-)
Special thanks to Brelki! xoxo
Endnote: Some of you have asked if there is an easier way to these tutorials. There always is and that would have to do with changing the way you view your face and learning symmetry and guidelines. It becomes geometrical anatomy. For the everyday cosmetic enthusiast, this is the best way.