This is a simple tutorial for creating a crease or depth to Asian eyes. This really works for all shapes of eyes, not just Asian ones. The main goal is to create the illusion of depth or to emphasize it.
For this post I used Jessica. Her eyes are monolid yet have that slight indent of what can be a "crease". Asians eyes have many variations yet they all have the same muscular and anatomical structure as occidental eyes.
The eyeshadows I recommend should be satin mattes since it is more on contouring and highlighting the eye. There is the basic ivory, matte medium brown, and black. All I can say about this tutorial is that it isn't easy; and the look of it isn't something that looks great up close. Looking at it inches away from the mirror is a bit too much but when seen from a foot away, it looks very real.
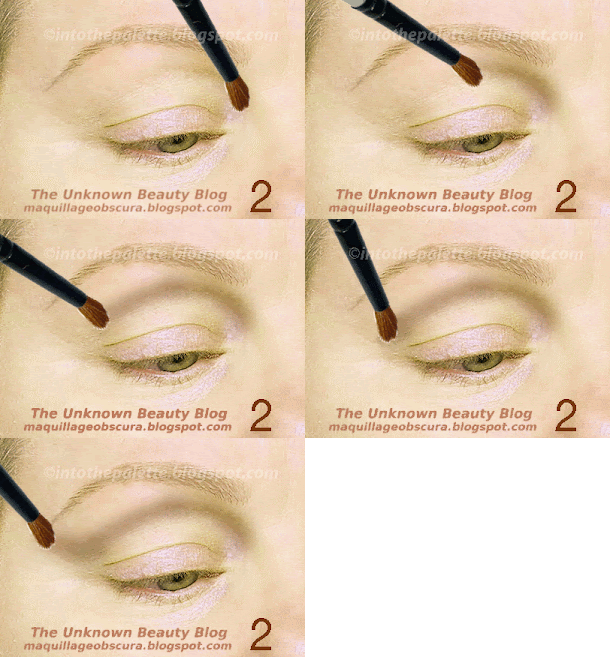
1-Starting with a clean slate. 2-3-Brush the ivory all over the lid from lashline to browbone. 4-5-Next take the brown and here I use the shadow blender brush that works well to apply color on the orbital ridge. 6-Take the blending brush and soften the line. 7-What it looks blended which becomes the hollow of the crease.
8-Take the black and draw a thick line on the top lashline. 9-As you get to the outer corner wing it up to the "crease". 10-What it should look like.
11-Line the bottom lashline. 12-Connect it with the top. 13-Blend the little tail so it blends with the brown shadow. Also blend the eyeliner a bit to smudge.
14-Blended. 15-Take the detail liner brush and apply a black line and blend it slightly. 16-End result.
17-I like to go over the outer end of the crease for more emphasis. 18-Take the same brush and soften the color. 19-Taking the same color contour the area between the eye and nose. Blend well until it is slightly lighter than the crease color.
20-Blended. 21-Go over the crease line again with black to re-emphasize the crease. 22-Blend the line minimally.
23-Before and After.
Special thanks to Jessica!
Remember, this is just a play of light and dark colors to create an illusion of the crease and lid. It won't look natural in real life but in a theatrical, film, and pictures; this can create the look. Hope you enjoyed the tutorial. Happy practicing!


