This post is really more about the Definitive Eyeshadow Guide. I am breaking down areas of the eye which really can leave some people pondering over as to why their eyes just don't look as open and wide awake as their caffeine driven brain.
Let's break down the eye area into 9 sections.
When you see a drawing this way, it really means nothing. So, get your brain out of the box and look at each little section. Do you get any different ideas? Probably not, I hear crickets chirping very loud!
Okay, let's use my eye.
This is how I see the perimeter or the sides of the square: the right side tells me I have to lift that side; the left says tells me I have to bring attention towards the center and to my nose; the top is my eyebrow which will frame the eyes from the forehead; the bottom is to highlight so my eyes are separated from my cheeks!
Okay, lets start with the outer and inner end of the eyes. Basically, what is done here is to separate the eyes from the face first because the eyes do not protrude like your nose and lips. They have to be separated in order to define and contour.
How would you do this? Well, the easiest way is to take a taupe eyeshadow which to me is the most important eyeshadow color. If I didn't have a MATTE taupe (not a fancy shimmer), I wouldn't know where to start my eyeshadow application. Taupe is basically a color which turns into your skin tone with a bit of depth but in daylight and regular light, it will be practically invisible. It stabilizes other eyeshadows also.
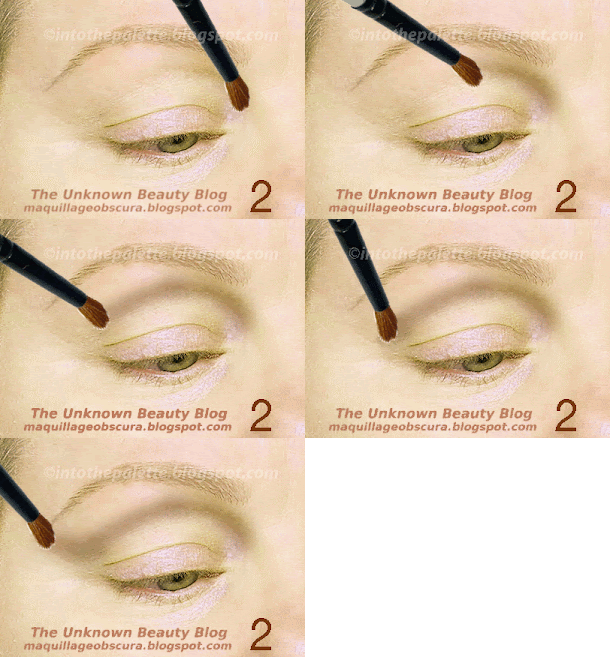
This is how I apply my taupe, (I apply it this way because my comfort factor has expanded. If you are a newbie or just aren't sure, try this method of shaping and defining.)
It is hard to see because, like I said, it disappears. Yes, I extend the color beyond the length of my eyebrow. This does two things, it gives the illusion of direction to which the eyeshadow will go. In other words when people look at you, they will see the eyeshadow going up and back. Two, it will separate your temple, eye area, and cheekbone area all at once.
The first picture shows how the middle horizontal row divides the lid area from your browbone as does the vertical boxes which uses your nose to separate the eye area. This is where the additional contouring of the nose and eyes occur to create some depth and to contrast with the highlighting. In the second picture, the two boxes marked is where the highlighting occurs because this is the area which becomes lost in the depths of muscular eye structure. Fake the light and open the eyes!
You can pretty much sculpt the eye into shape. You just have to analyze your eye.
Since I applied the taupe, I have already swept up and back. Now, it is more of outer end of the lid. What and how color is applied here will really make a major difference in how the eye shape ends. The most important point to remember is ALWAYS allow the eyeshadow to go UPWARDS!
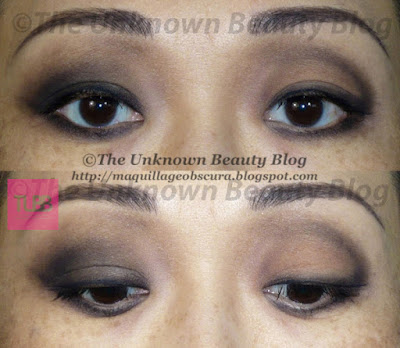
Here are two different ways I applied the eyeshadow. On the left, I applied it like a winged eyeliner. On the right, I applied it more perpendicular to enclose the lid.
And the difference results in a different shape for each eye. The left side looks more elongated while the right side is more round.
What you are basically left with now is to highlight the rest of the eye area. The center is usually captures the light since the shape creates a bulge. Might as well let it glimmer. The browbone is pretty basic, just light it up.
And this is how my basic eye look ended up which is really a basic smoky eye. Notice the taupe eyeshadow which divides the eye area from the nose and sweeps your eye back and up on the outer sides.
And here it is on Jane.
Eyeshadow is basically just shading and highlighting the eyes into shape. And shape may mean highlighting and contouring beyond your regular eyeshadow zones. Remember, you have a face and your eyes are only one part of it. You need to balance your eyes with it to see how eyeshadows can really change your look and your outlook!
I hope this helps some of you in understanding. There is more to it but I will leave that to future posts. For now, just get those crickets out of your head!


