Okay, where was I? Eyeliners and eyeshadow brushes. I have to admit that organizing pictures for these brushes took some time. I wanted to get the brushes that would be most useful in shape to eye application and their differences. I know brushes can be boring to look at.
So much more fun to see how someone applies eye makeup and to see the outcome. Well, I am working on that for different eye shapes for future postings. What is important now is to understand brushes.
Eyeliner brushes come in angle, flat, round, and filbert. In the picture you can see what liner brushes I have. I don't use all of them but when there is a specific application I am looking for, I do choose the specific brush. In the picture above from top to bottom: Julie Hewett round brush(it says angled brush but really a round brush), Cinema Secrets round #2, synthetic angle from art supply storeHana K flat eyeliner, Cinema Secrets angle #4, and Make Up ForEver pointed round brush. You see repeats in this group, the Hana K and Cinema Secrets angle #4 I used them for brows. Make Up ForEver and Cinema Secrets filbert #2 were in the concealer post.
I choose a brush for my specific need. Let me start with Julie Hewett’s brush. This is a taklon nylon brush. You can see from the picture it isn’t exactly a firm. It is very small and lacks a point unlike Make Up ForEver. Why would I want to use this? This is used to apply a line that is almost undetectable, very close to the lashline. What is the purpose? Well, if you ever watch film and tv shows with the no makeup look, they are wearing makeup and they are wearing a very thin line on their eye. Why not tightline? Not all people like tightlining. The inner rim is highly sensitive and if the eye waters, well that is time wasted in the pro field. In the regular consumer field, sensitivity matters, just because the method for tightlining is out there, doesn’t mean you have to do it. And, if you want the naturally defined look without looking lined, this is the way to go. From the picture you can see how close it can get to the lashline.
- Step 1- the color is saturated from tip to pretty much the entire length of the hair.
- Step 2 - The entire brush is pressed onto the lashline.
- Step 3 - continue the line.
- Step 4 - you can see how detailed the line gets. Pausing is not going to ruin the line.
- Step 5 & 6 - just go back over the area that was missed and continue.
- Step 7 - the line to the end of the lashline. (You can flick it up for a winged liner which will be covered in a future post.)
- Step 8 - a finished lined look for a natural line.
The angle liner applies liner by using the slant of the brush.
- Step 1 - saturate just the tip.
- Step 2 - You can see that the brush will rest at an angle along the lashline.
- Step 3 - continue the line. Short strokes and taking a pause in between is better than holding your breath and trying to make one long perfect stroke. (This could lead to passing out!)
- Step 4 & 5 - you can see the line.
- Step 6 - I take that pause so I don’t pass out.
- Step 7 - I continue starting where I left out, well I take a breath first.
- Step 8 - the finished result. I kinda flicked it up just to show it is possible for a winged liner application.
The filbert eyeliner brush. I am nuts over this brush! (Yes, pun intended.) This is a brush that suits most of my eyelining needs. It doesn’t say it is an eyelining brush, it just goes by number which determines the size of the brush. I find Cinema Secrets #2 is the perfect size. It is similar in size to Bobbi Brown’s Ultra Fine eyelining brush.
- Step 1& 2 - What I like about this brush is that it has a wide width and a thin one when turned sideways. It also has a tip that allows precision application when needed. I saturate the tip and about halfway down the brush hair with color.
- Step 3 - I use the tip to start eyeliner application to get a close line to the lashes.
- Step 4, 5 &6 - shows how the tip applies a thin line (I take a breath).
- Step 7 & 8 - I turn it sideways to allow more of the brush hairs onto the lashline. In fact, if this is your method of application, by all means use this from the start. I am just showing here, how versatile this brush can be.
- Step 9 & 10 - I use the width of the brush to draw a thicker line.
- Step 11 - you can see the thickness of the line towards the end.
- Step 12 - If I ever wanted to smudge the line for a smoky eye, it is possible with this brush too. Again, this is my favorite brush and since it is a Kolinsky sable brush, I can use this with any type of formula.
The previous pictures were examples of eyelining brushes that work for the majority of people. You don’t need every eyelining brush out there. The most important is to pick the one that works for you. Remember, smaller the brush head, the more detailed work it will do.
Eyeshadows
Now that I have explained to you some of my eyelining brushes. Next up are the eyeshadow brushes. When I didn’t understand eyeshadow brushes, I practically wanted every brush out there, thinking one brush will apply eyeshadow better than the next. Yeah, it did at first; but in the end, I sucked at makeup application. There are basically three types of eyeshadow brushes that I use: filberts, rounds, and fluffs. The filberts are very important because they apply the “shape” to the eye. The rounds which come in pointed or domed, I use to buff and blend. Last but not least, I call these fluffs because they are soft and flimsy and really just fluff on eyeshadow without really applying a shape to the eye. Again, you may disagree, but I had to categorize my brushes to understand them!
The following are filberts.
From top to bottom: Sue Devitt eyebase brush, Da Vinci #14, Da Vinci #10, and Paula Dorf Smudge brush.
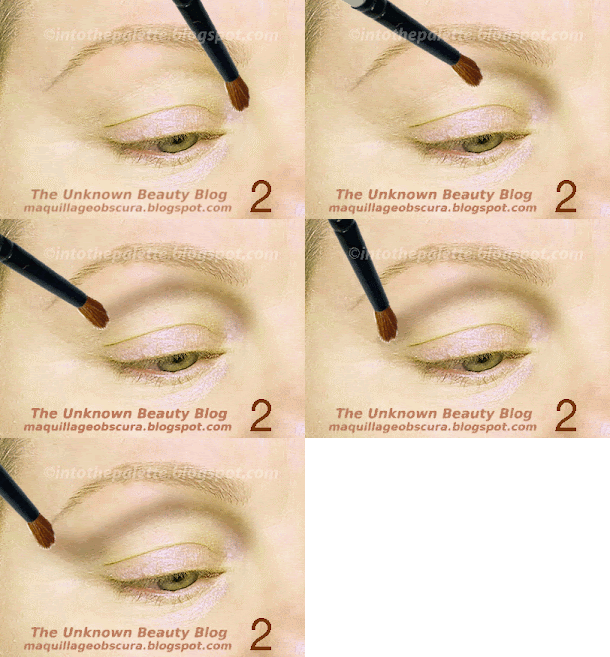
The following picture shows versatility in the Da Vinci which is sable hair. It can create lines and shape
- Step 1 & 2 - shows a saturated tip. You can use the thin side or you can use the width of it.
- Step 3 & 4 - I take the tip and draw a line. (pretty much like I did in the concealer post.
- Step 5-see how I am drawing the eyeline?
- Step 6 & 7 - I draw another line above. (Think of it as your crease.)
- Step 8 - Now I take the width.
- Step 9 - I want to blend (The corner of the eye. The “V” area.)
- Step10 & 11 - I just gently press and soften the lines.
- Step 12 - you can see the end result.
- Step 13 - I want to apply more color (imagine it to be the lid). I saturate the brush half way the length of the brush head with color.
- Step 14, 15, & 16 - I press the brush using the width of it, I apply color.
- Step 17, 18,& 19 - I also can apply by “licking” the color. (Just like the one in the concealer post.)
- Step 20,21, &22 - This is actually theSue Devitt filbert brush which is also a sable brush. (This was also posted in my concealer post.) Since this has a big brush head, it useful for blending the shadow.
Round brushes are often sold as crease brushes, but as crease brushes, I find them useless because they are usually to flimsy and soft to apply color with precision unless it is a firm and small round one. From the pic you can see the three different types of round brushes. Top to bottom: Da Vinci round domed, Cinema Secrets small definer brush, and Laura Mercier crease brush.
I use round brushes as blenders. However, depending on the hair and shape of the brush, they can do more than just apply a smudged line. First off you can see how the DaVinci domed and Cinema Secrets pointed round (small definer) work. The DaVinci brush is a pony hair brush that I like to use as a buffer or blender for my eyeshadow. This one pretty much can buff edges away without destroying the shape the shape of the application. It softens and gets rid of any excess eyeshadow powder that may be on the lid. The Cinema Secrets softens a particular area with its point. Sometimes, when you find your eyeliner too much of a line, this will smudge it and the point will act as a guide on where you are smudging.
Fluffs, what are fluffs? They are like the mop head brushes. They usually fan out like a “V“. Sometimes, they are firm but I find they really can’t provide a shape to my eye that I want. They can blend and apply a layer of color onto the lid. And, that is what I use it for. Here are some of my fluff brushes. From top to bottom: Bobbi Brown, Vincent Longo , and Prestige.
You can see in the next picture that I use the Bobbi Brown brush to layer a shimmery color over the matte black. Think of the matte black as a smoky eye and I want something more to it but I don’t want to disturb what I have shaped. This is where a fluff brush will apply the shimmer. The black is still visible and the shimmer begins to give it dimension.
Now, go back to the Cinema Secrets small definer brush. This is squirrel hair although it is soft, it can apply inky liquids. Here I used a Fyrinnae Ink to layer over my black. See how that works?
So, now that my brain hurts from sorting out the eyeshadow brushes, I just want to let you know that this is just a guide. I divided my brushes this way because it works out for me. For you it could be different. But you get the general idea. And, don't forget the Q-tips and sponge applicators, they are still useful. This isn’t the end of the brush postings but the rest of the brushes are easier than the eyeshadow ones. I know I missed some things but I really can’t think anymore!


