

* Updated March 2, 2025* And an Urban Decay Naked Basics ($27) upgrade.
Possible to depot Natasha Denona Mini Palette too!

My first stint as a depotter occurred back in the tail end of the 1970's. I sat in my bedroom admiring my Borghese GWP palette. My first real make up palette from a cosmetic counter line. How I gazed at it for hours until I noticed one of the shadows had loosened from the base. I was devastated. Then I thought, if I could remove the rest of the shadows and just add other makeup items that I liked, I could have my own ultimate customized palette! But how would I remove the eyeshadows?

This is copyrighted! Please credit!
Libel, Slander, Defamation


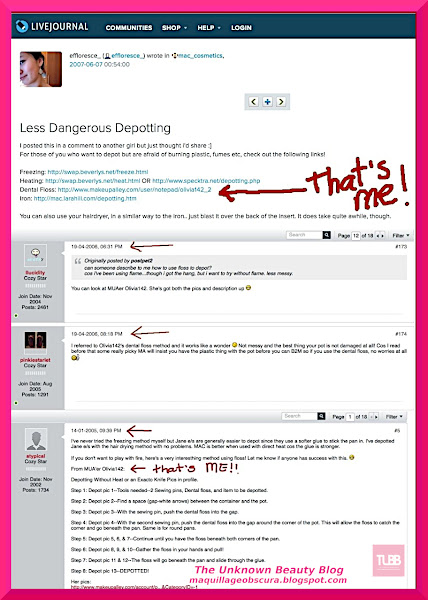
Proof of Concept!
Someone posted this on reddit: reddit
Sources for the pix: LiveJournal effloresce_, Cozy Cot. Makeupalley forum.
Notice the years: 2005,2006, & 2008!!!

Sources for the pix: LiveJournal effloresce_, Cozy Cot. Makeupalley forum.
Notice the years: 2005,2006, & 2008!!!


Beauty blogging is Completely WORTHLESS!!! Truly hurt by this action!!!

Special Thanks to Ken Ogilvy from Wayne Goss's Timeline
Thanks for some common sense input!!!!!!!!❤️❤️❤️

The tools I had on hand to depot were housed in my sewing kit: sewing pins and thread. I later replaced the thread with dental floss because it was easier to grab and hold. I try this method first, my last resort is using heat because that destroys the case. Keeping the case undamaged allows me to house the makeup in it again when I want the un-depotted look. This method works on all makeup, not just eyeshadows. I have depotted blush, foundation, and cream eyeshadows and blushes. Yes, cream products won't melt! Can everyone do this? Yes, but it takes patience and can be challenging at first. Once you get the hang of it, it's easy.

Here is my method step-by-step (which I first showed on another site long ago). I chose to depot my NARS eyeshadow D. Gorgeous.

1-Find the gap between the case and the pan. 2-Stick in the sewing pins to get the feel of the gap and to loosen a bit. Sometimes, just the pins alone will loosen the pan and it will come out. 3-Insert the dental floss into the gap. Make sure the length of it is long enough for you to grab.

4-What is important is to get the floss under the pan by pushing it in between the gap with the pins. 5-Continue around the pan. 6-Allowing the floss to go under two corners ensures it will go under the pan when the floss is pulled. (For round pans, just make sure it sits under the pan.)

7-The floss has been pushed under the two corners. Pull on the floss, this will slide under the pan and cut through the glue. 8-Another view. 9-See how it has slid under the pan?

10-The floss cuts through the glue underneath the pan. 11-The pan separates from the case. 12-Depotted!

This is how it looks like underneath the pan.
Like I said, this is the first method I choose and have done this with many high end brands including Chanel which way back had that terra-cotta base beneath the color. I have done this with MAC which is the easiest to depot with this method. I admit some brands will not work without some heat. For others, I have placed the makeup in the freezer making the glue lose its adherence. This depends on the type of glue and ends up more of miss than a hit.
There you have it, how I depot my makeup. Now, you know how I modified my Naked Palette 2 ½.
And here is my modified Naked Basics Palette.


I found Naked Basics needed some warmth for some depth. I took Buck from Naked Palette 1 and placed it into the Naked Basics. Now, I have an Urban Decay Naked Basics 1.2!
Disclosure: No palettes or makeup were hurt in this post.


